• Skip to primary navigation
  • Skip to main content

Social Good Software

Creating amazing guest experiences through innovative software solutions for the social good community

  • Features
    • Deduper
    • Calendar Builder
    • Email Designer
    • Barcodes Scanner
    • Online Template
    • Checkout Flows
    • Membership Portal
    • Data Bridge
  • Pricing
  • Contact
    • About
    • Contact
    • Careers
  • Login
  • Get Price

Help Center

eTicket email template for Altru

October 13, 2021 By Rick Hernandez

Download Template

Have a hard time creating your eTicket Email? We got you!

We’ve created a template solely to give you a starting point. This eTicket Email template is handy when sending the eTicket email out to guests through the Email Designer. You can easily customize it based on your organization’s preference. You also have the option to add images and additional details. 

Watch this short video which will walk you through the different parts of the E-Ticket Email template, or you can follow the steps below:

1: Before you edit the eTicket Email template, copy it first through this link eTicket Email and save it to your Google Drive or download and revise it in Microsoft word.

Save to Google Drive

Download to Microsoft Word

2: Replace the highlighted text with the organization’s information and make necessary revisions.

3: Add an image to the email to make it more personalized. The recommended size is 800×200.

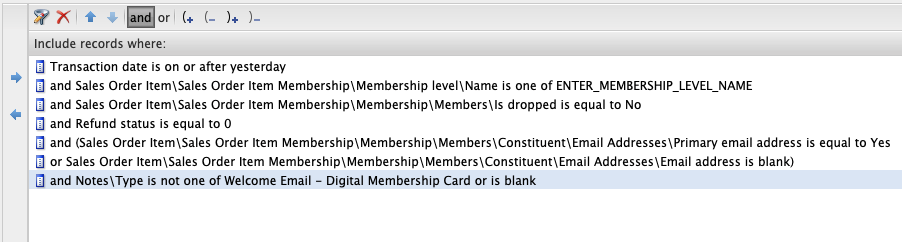
4: Use the merge field to add value to the email by going to your Altru query and exporting it out. Below are the merge fields that we added for your reference. 

Note: You can replace the Merge Field or position it wherever you want in the email.

5: Add the transaction details through the use of merge fields.

After filling up the template with all the necessary details, adding additional information if needed, and having your image ready, it is time to proceed to the onboarding call and discuss how we can move on with your E-Ticket Email.

Filed Under: Email Designer, Email Templates

How to get the SSL Certificate from GoDaddy

September 27, 2021 By Rick Hernandez

Introduction

An important document to obtain nowadays is an SSL certificate for safety and security on the Internet. It certifies ownership of the website, keeps user data secure, and prevents hackers from creating a fake version of your website. Obtaining this certificate is crucial for your website, especially since creating subdomains requires one to carry over throughout the domain name. Here, we explore how to have an SSL certificate through GoDaddy.

Requirements to Get an SSL Certificate

overviewDownload

To use a self–signed SSL/TLS certificate, you must provide the certificate and its private key. You must also include the certificate chain to use a certificate signed by a certificate authority (CA). Your certificate must satisfy the following criteria:

  • 1024-bit RSA (RSA_1024)
  • 2048-bit RSA (RSA_2048)
  • 3072-bit RSA (RSA_3072)
  • 4096-bit RSA (RSA_4096)
  • Elliptic Prime Curve 256 bit (EC_prime256v1)
  • Elliptic Prime Curve 384 bit (EC_secp384r1)
  • Elliptic Prime Curve 521 bit (EC_secp521r1)

The certificate must be an SSL/TLS X.509 version 3, containing a public key and the fully qualified domain name (FQDN). It must also include information about the issuer. The certificate can be self-signed by your private key or by the private key of an issuing CA. A signed certificate by the CA must include the certificate chain when importing the certificate.

Using GoDaddy to Get an SSL Certificate

For the sake of this tutorial, we are using GoDaddy to purchase an SSL certificate. You may use another provider if you do not wish to use GoDaddy.

Assuming you already created an account and purchased a certificate, go to account.godaddy.com/products, and click on Manage. It will show you all the details of the certificate for your subdomain. On the box that says Download Certificate select “Apache” as the server type, and download the ZIP file.

Get SSL Certificate: ZIP file contents
The zip file contains the three certificates; you will need to provide the appropriate key

IMPORTANT! Upon purchasing your SSL certificate, it will give you a private key. Please keep this safe and backed up, as you will need this for uploading the new certificate to your subdomain. This key will not download in the ZIP file.

Summary

Obtaining an SSL Certificate will ensure your guests that you own this website. It also shows that you are committed to keeping their data safe and secure as they do business with you. Your reputation as a business proves when you keep security your number one priority on the Internet. If you have other questions about Internet safety and security, don’t hesitate to get in touch with us.

Filed Under: Development, Help Center, Membership Portal

How to add a subdomain to your portal

September 23, 2021 By Rick Hernandez

Introduction

A neat and well-maintained domain for your website brings tremendous professionalism to your organization in the Internet era. When you have separate sections in your domain, like members, clubs, support, and others, it is recommended to create a separate subdomain to easily navigate to that section. It is easier to navigate to members.domain.### than domain.###/sections/members. In this tutorial, regardless of what DNS provider you have, follow along to create a subdomain. (In our tutorial, we will be using Cloudflare.)

Add a subdomain

This tutorial will use Cloudflare, but if you use a different DNS provider, the process will be the same or near identical, with the exception being your setup of SSL or TLS protocols (certificates for security over networks). 

1. Create a new CName record.

Inside of Cloudflare, go into “DNS” and add a new record. Inside fo the interface, there are options to change the type of record. Change this to “CNAME.” From here, name your subdomain.

2. Grab the target address.

Go into Social Good Software. For this example, since we are making a subdomain for memberships, we went into Development -> Membership Portal -> Settings to find the target link. Copy the link from after the “https://“ to the end. It should look something like this:

00000000-a000-000a-aaaa-000a000a.socialgoodsoftware.com

Add a subdomain: membership portal target address
The beginning of the link should be unique to your organization

Paste this link into the DNS page under the Target box.

3. Configure SSL/TLS Settings.

Configure these settings to generate secure certificates for your website, enabling SGS to work properly with your website. If you have issues with this, since this is unique to each organization, you may need to configure this by contacting support with your DNS provider.

To view how to receive a SSL certificate from GoDaddy, click here or click on the link below.

https://socialgoodsoftware.com/how-to-get-the-ssl-certificate-from-godaddy

4. Configure SEO in SGS

Go back to the Social Good Software app, and go into Development -> Settings -> SEO. Under the Domain Alias on the top right of the screen, type in your subdomain name. In this case, we use “members.codewithintent.com” since we are making a members subdomain. Save settings before closing out of SGS.

Add a subdomain: SEO configuration in SGS App
Add your subdomain to the address in this box

Depending on your DNS provider, finishing your SEO configuration will either instantly make your subdomain live, or it may take longer—a few days maximum—to get everything situated and live.

Summary

Creating a subdomain in your DNS and linking it to SGS helps maintain a professional Internet presence. It gives your users a simple, clean experience working with your organization. Familiarize yourself with your DNS provider, and you can get subdomains up in no time. If you have any other questions, please feel free to contact us anytime.

Filed Under: Development, Help Center, Membership Portal

How to merge two records together with Altru using the Deduper

September 8, 2021 By Rick Hernandez

The Deduper application is a powerful application for managing records in your constituent database and removing duplicate records that it sees. As you continue to use it, you can see many tools at your disposal to view different records in depth, compare different values, and run many scenarios to clean and manage your database better. Of course, the application only works if you understand how to merge records, delete records, and ensure everything is working with Altru. So, how do we merge records in the Deduper, and does it run everything with Altru in real time?

Steps to Merge Two Records Together

  1. View Record. At this step, we are assuming that you have built the query in Altru already. With this in mind, click on “Sync Activity,” and then click on “Find Duplicates” in the Constituents tab; this will show your duplicate records, and allow you to view any one of those accordingly. Click on the duplicate record you want to view and potentially merge.
Example of viewing a duplicate record in Deduper to merge two records together
Example of viewing a duplicate record in Deduper
  1. Review and Click “Merge Records.” After looking at the two different records, you can see the records may have the same name and email address. The only things that differ include the order count and the date the database created the constituent. If you are confident these records are the same person, locate the “Merge Records” button on the top right corner.
  2. Click “Merge Records” again. Depending on your internet connection speed, the number of records in your database, and so on, the merging process may take a few minutes to complete. You will be notified as soon as the merge process is completed.
  3. “Sync Activity” and “Find Duplicates” again. If the number of duplicate records goes down, you will know that everything is working correctly. If any issues arise, please contact support.

Summary

Using the Deduper to merge records will help clean your database even further than Altru could, saving you time and giving your database administrator peace of mind. As always, please contact us if you have any further questions on how to use the deduper!

Filed Under: Data Merge, Deduper, Help Center

How to update phone number or address with Altru

September 7, 2021 By Rick Hernandez

In your web forms, you create all kinds of methods for your guests to purchase tickets, edit membership details, and so on; however, what if you have a change of address or phone number with your own company? You will need to go into Altru to update the phone number or address, which we will walk through in this tutorial. It’s time to dive into Altru and edit that form!

Steps to Update Phone Number and Address

  1. Navigate to the Web Form to edit. Enter into your Altru account, then click on “Web” on the Navigation Bar on the top of the screen. Click on Page Designer, then navigate to “Configure Content.” Scroll to the bottom of the dialog box, and locate your contact information in a textbox. Click on the gear that pops up on the top left of the text box. Click on the “View” tab, and edit the code.

The navigation to this place looks like this:

Altru Home Page > Web > Page Designer > Configure Content > Gear on Contact Info textbox > View > Edit Code

  1. Search for the information to edit. For ease of finding the information, press Ctrl + F (Windows) or Cmd + F (Apple) to find the code where the phone number or address is. After locating the information to edit, place the new phone number or the new address into the box. Make sure to save your information before clicking out of the box.
    1. Why do we do this? Can’t I just edit the information from the Configure Content tab?
      You could do that, but doing so would remove the link attributes, meaning that clicking or tapping on the phone number would not automatically call the number or navigate to the address. Keeping a link would give ease of access to guests when they want to call the number or navigate to the address.

Summary

Hopefully, editing these forms through Altru will help make organizational changes easier to perform. These edits will make your web forms and website consistent throughout. If you have any other questions on how to use Altru or SGS, please contact us. We are more than happy to help!

Filed Under: Altru, Help Center, Online Template

What email to use when creating Altru account

September 7, 2021 By Rick Hernandez

Introduction

To use Altru and Social Good Software together, you need to make sure you got some assigned and designated email addresses to do this. This could be a difficult task to complete, since there is a lot that goes into creating an email and knowing what to do in creating the email. This guide will help you in any questions that you may have so creating a designated email will be easy to do and simple to connect.

Altru Email Setup

One of the most important steps to perform in creating an email for SGS staging and production is to use an email from your organization. Also this email must be separate from a regular account used by organization members (some examples of usable emails could be marketing, customer support, and other accounts NOT being used for auditing). 

Reasons why an Organization email is important to use:

  • Logging and Security purposes to keep track of activities done by users and lessen the possibility of a potential breach.
  • Reset passwords without using another user’s email
  • Keeping credentials different from other users.

After creating or assigning your organization email to Altru and SGS, head into Altru > Administration > Application Users > (Either find this account or “Add” a new one). The roles to assign are as follows:

  • Marketing Manager: able to view sales and revenue data, constituent information, event information; also, given the abilities to schedule programs, manage discounts, export query results, and generate reports and KPIs.
  • Web Forms Administrator: enables the ability and maintenance of web pages to allow donations, ticket purchases, membership programs, and event registration.
  • Development Data Entry: allows the user to programmatically add attributes to a constituent’s record.

Altru Email Maintenance

Here are some additional tips when setting up the email address:

  • Limit sharing with other services. This email should only be shared with SGS to maintain logging and security.
  • Login to the Altru account and email every 6 months at least. Doing this will ensure that you don’t need to reset a password every 6 months in either the email address, SGS, and Altru.
  • Using the same email address in staging as production is acceptable. Keep roles in mind, however, as it does change what this address has access to changing. It is recommended to use separate accounts for staging and production, giving more usability to production.

Summary

In creating or designating an email for use in Altru and SGS, keep in mind to use an organizational email address that isn’t currently in use for auditing. Assign the roles Marketing manager, Web Forms Administrator, and Development Data Entry to the account through Altru. If you have other issues with creating Altru Accounts, refer to this article:

How to create a new account with Altru

If you are ready to connect this Altru account to SGS, refer to this article to know how:

How to connect Altru credentials with the Social Good Software

If you have any other questions, don’t hesitate to ask us!

Filed Under: Account, Account, Help Center

Automated welcome email

September 6, 2021 By Rick Hernandez

Queries in Altru are used to gather information from the database. You can utilize it in creating memberships, sending emails, and so on. One query that is useful to your organization is an automated welcome email for first-time membership purchases. It will help you save time on sending welcome messages to new members and generate digital membership cards. With query for automated email, you do not have to wait until the back-end batching processes are complete. It will automatically send welcome emails to your new members.

Below is a query for an automated welcome email. You can use it as a reference to effectively send welcome emails to your new members.

Automated email sample query:

automated welcome email

Summary

This query is very useful for sending emails that welcome new members and create membership cards for them automatically. To you, this provides greater ease of access in using SGS’s Email Designer and Altru.

If you have any other questions about the query or other topics, feel free to contact us!

Filed Under: Email Designer, Help Center, Membership Queries

What is the difference between the three email types?

September 1, 2021 By Rick Hernandez

Introduction

You’ve entered the phase of setting up emails using the Email Designer, copying and pasting some ODATA links, and setting up the UI Design to make the emails look pretty. After punching in some steps, you’ve come to a crossroads: Email Type. Three buttons appear on this screen, saying “Transactional Email,” “Membership Email,” and “Reservation Email.” Thinking about what you are making emails for, you find that your email may fit nicely into two or all categories, or perhaps you may not understand what you would use “Reservation Email” for… The three email types: what is the difference?

Three Email Types

#1: Transactional Email

Congratulations! Someone buy a ticket for the event next week! Now you need to create the purchased ticket, make it a PDF, attach it to an email, and send it to the constituent… It sounds like a lot of work to put in for every transaction that happens each day. But Socia Good Software made it easier by sending automated transactional emails once your customer made a purchase. Some pointers to remember: First, see to it that you include the constituent record ID, email, and the event date so your guests can remember. Also, SGS made it possible to attach tickets in PDF form, and customers can add them to their Apple Wallet and Google Pay apps.

#2: Membership Email

Do you wish that notifying your members to renew their membership becomes easier? Sends an attractive membership card to your new members? SGS can make it simple for you to send out membership cards automatically, along with any reminders and updates to membership perks, renewals, etc. Make sure to tag your email as a membership email, and you can add your membership card details and other perks to keep your VIP guests informed and excited.

#3: Reservation Email

One handy tool Altru utilizes is the ability to create group sales and facility rentals for your organization. Email that uses for these utilizes more information than the usual Transactional Email: they have multiple price types, itineraries, group types, and more. So what kind of email can you send for Joey’s 8th birthday party at your organization? Are there different price types for Joey and his friends versus his mother and her friends? The reservation email is the best option!

*If you haven’t set up group sales defaults yet, Altru provides a group sales checklist that you can access by going into “Tickets” and selecting “Group sales setup.” You can also set up a reservation calendar to add constituents, set up group types, etc. 

After making a query to search for groups that show up in x amount of time–48 hours, one week, whichever you choose–the setup for this email is similar to other transactional emails. Remember, you may ask a group to check in to an event space rather than giving them eTickets, and you may need to group grid items differently. On the other hand, instead of sending all the group itineraries and whatnot, this email is great to use as a reminder email letting others know that they have a group reservation or they will go to your organization two (2) days from now. 

Summary

Now that you understand what each email entails, you can make a more informed decision on what to use when designing your emails. If you have any further questions, please let us know, and we will do our best to keep you moving forward!

You can also check the Post-visit email template, eTicket email template, and Reminder email template, which serve as your guide. 

Filed Under: Email Designer, Emails, Help Center

Detaching emails from constituent records process

August 25, 2021 By Rick Hernandez

Introduction

One of the powerful tools built into the Deduper has the function of detaching emails from constituent records so the records are concise and cleaner. Sometimes, constituents have multiple emails or a different primary email, and it may be difficult to decipher which email is better to utilize in the constituent record. Going through the following logical process will help you determine the best email to choose.

Process of Detaching Emails

The Deduper Detaching Process from Data Imports is very useful as it help automate the overall process of detaching emails. Using the Download option after finding duplicates, check the box that says “Automatically mark as Detach.” Upload the data but make sure to review the file in Excel first to see if you are satisfy with the emails that about to be detached.

Step 1: Grab System Record ID and Primary Email Address.

  • We start by reading the first row from the spreadsheet to get the System Record ID of the constituent.
  • Create a query in Altru with the System Record ID to get all the email addresses found on the record:
    • If there are no email addresses found no need to remove anything. The process ends.
    • If at least one email address is found the  process continue.
  • We get the primary email address attached to the record and compare it to the one in the spreadsheet
    • Convert both emails to lowercase and compare.
    • If the emails are not the same the process ends and no email is detach.
    • If they are the same the process continues 

Step 2: Detaching emails with attached Sales Orders

  • If found no sales orders:
    • We check if we have multiple email addresses
      • If found more than one email address:
        • We look for a non primary email address and set it as the primary email address then the process continue.
      • If found only one email address, the process continue.
    • The email is detach from constituents record and the process ends.
  • If there are sales orders:
    • We get all the delivery email addresses
      • Compare each delivery email address with the primary email address
      • If the email address is the same as the primary email address its saved
        • We also store the Lookup of the sales order to restore data if needed
      • If the email address is not the same as the primary email address its ignored
    • We get all the sales orders who match the primary email address
      • If there’s no sales orders found
        • We check if constituent has multiple email address
          • If more than one email address
            • We set a non primary email as the primary email
            • We remove the attached email address and process ends
          • If there’s one email address found
            • We remove the attached email address and process ends.
      • If there are sales orders:
        • We remove the delivery email address from each sales order
          • We store the lookup ID for each order as a backup
        • Again, we check if constituent has more than one email address
          • If more than one email address
            • We set a non primary email as the primary email
            • We remove the attached email address and the process will ends.
          • If found just one email address:
            • We remove the attached email address and process ends

Summary

By seeing the logic behind what the Deduper does in detaching email addresses, you can see how the process helps clean constituent records and help run your Altru database more organized and efficient. If you have any more questions about the Deduper and how it works, please contact us!

Filed Under: Data Merge, Deduper, Help Center

How to set up calendar days

August 23, 2021 By Rick Hernandez

Introduction

Calendar Builder is a tool that you can use to create and customize a calendar for internal and personal use. You can also utilize this tool to modify your calendar before sharing it on your website.

When you set it up, you must consider its visual appearance. Making the days with scheduled activities be visible rather than all seven days will make it easy to look up and organize. With this, you can pull off a more sleek and direct look at what events are coming up on what days

Steps on how to set up the calendar days.

1: Go to your Social Good Software account

2: Proceed to the tool.

3: Select which one you want to edit the display date.

4: Click on Settings at the upper right side of the window.

5: Look for the option “Setup Calendar Days” in the second column of the Settings which help you change the days displayed.

6: Click on the gear icon and choose the day you want to display.

7: Don’t forget to save all the changes you made when you are ready to export it.

Summary

Having fully customize option is a great plus for your organization. We hope that you learn more about this tool and take advantage of it to customize, edit, and organize your calendar. As always, if you have any additional questions, don’t hesitate to ask us!

Filed Under: Calendar Builder, Calendars, Help Center

  • « Go to Previous Page
  • Page 1
  • Interim pages omitted …
  • Page 7
  • Page 8
  • Page 9
  • Page 10
  • Page 11
  • Interim pages omitted …
  • Page 20
  • Go to Next Page »

Social Good Software | Altru software integrations | Deduper | Calendar Builder | Email Designer | Barcodes Reader | Checkout Flows | Membership Portal | Online Template | API Integrations