• Skip to primary navigation
  • Skip to main content

Social Good Software

Creating amazing guest experiences through innovative software solutions for the social good community

  • Features
    • Deduper
    • Calendar Builder
    • Email Designer
    • Barcodes Scanner
    • Online Template
    • Checkout Flows
    • Membership Portal
    • Data Bridge
  • Pricing
  • Contact
    • About
    • Contact
    • Careers
  • Login
  • Get Price

Membership Portal

How to edit membership portal content

May 23, 2022 By Rick Hernandez

Edit your membership portal content to align it with your organization’s design and style. Follow the steps provided below to know how to modify each page of your portal and add touches based on your organization’s preference.

Steps to edit membership portal content

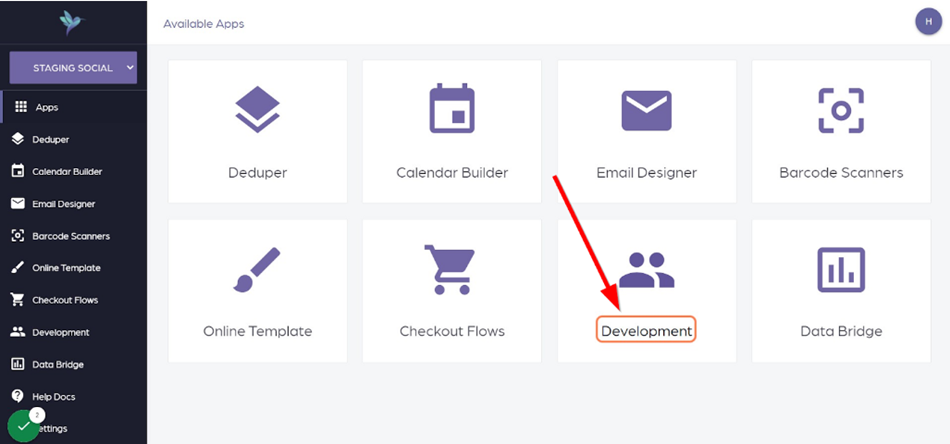
1: Go to your Social Good Software account.

2: Click on Development.

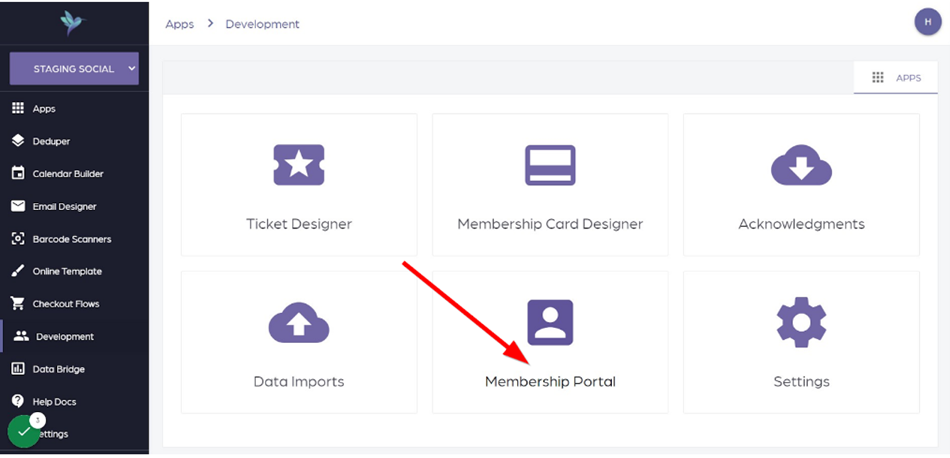
3: Proceed to the Membership Portal.

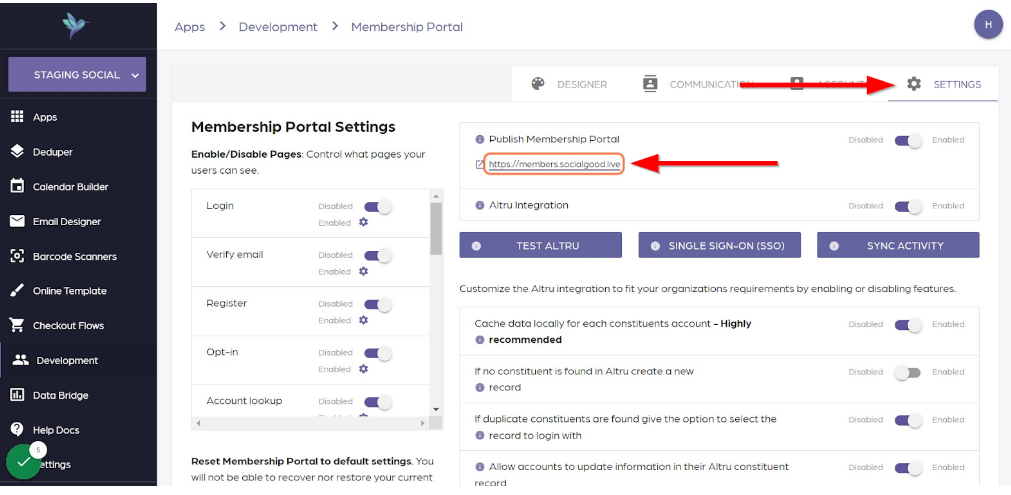
4: Go to Settings then click the Membership Portal link to preview its content.

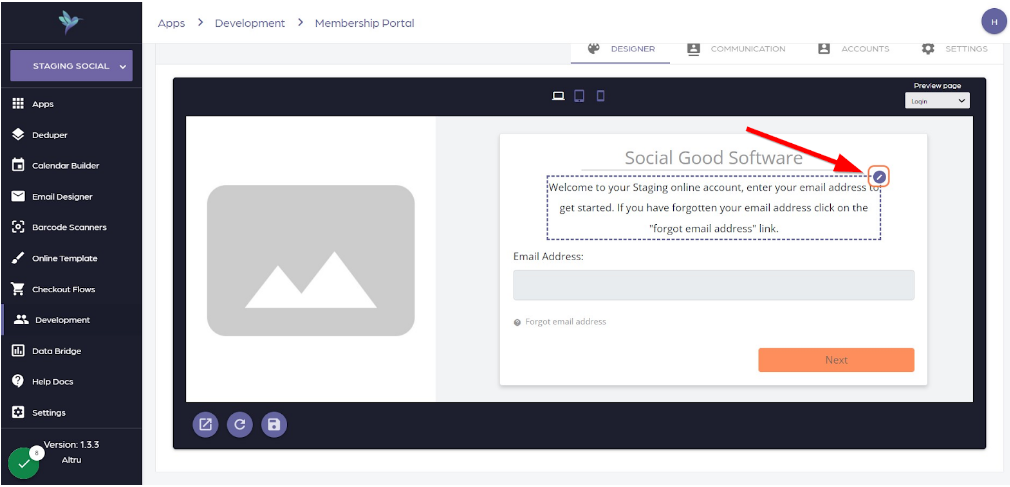
5: You can edit the membership portal content by going to the Designer tab. 

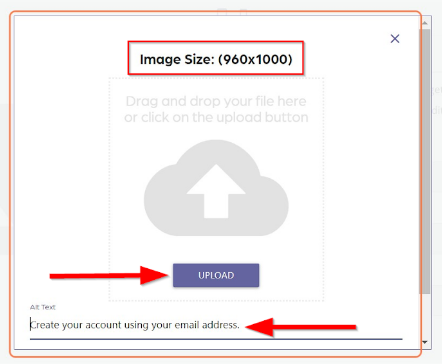
6: Click the pencil sign to start adding an image and edit the content. When adding an image, click the delete icon and then upload the picture.  Make sure that it has the exact image size required by the portal to avoid being cropped. You can also add an Alt tag for it.

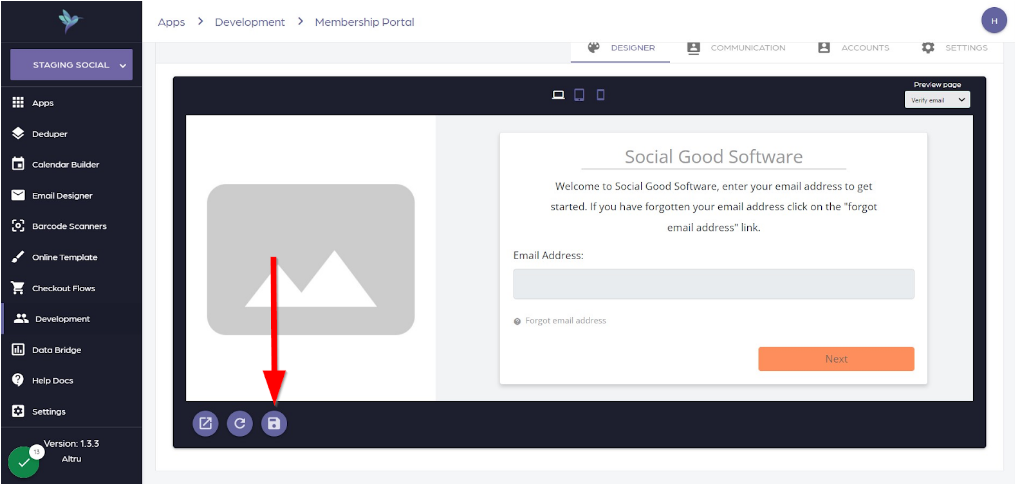
7: Preview to check the changes you made, then click Save if you are happy with the output.

8: You can edit the following  pages the same as the above example:

  • Login
  • Verify email
  • Register
  • Opt-in
  • Account lookup
  • Phone lookup
  • Membership lookup
  • Help
  • Email’s found

9: As for the following, you need to log in to your account before you can make changes to these pages:

  • Overview
  • Orders
  • Refunds
  • Membership
  • Account
  • Questions and Answers

10: To edit the above pages, log in to your SGS account then go back to Designer and refresh. Below is the Overview page that you can modify, click on the pencil sign and change the labels as you want. Save the changes you made if you’re content with the output.

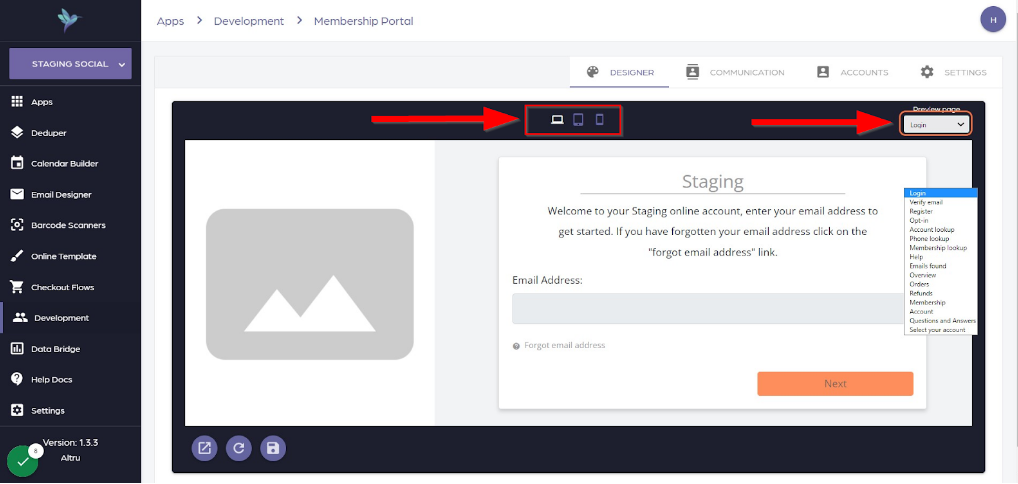
11: You can proceed to other pages and make necessary changes by going to the Preview Page. You can also check what these pages and sections look like on desktops, tablets, and phones.

You can edit your membership portal but some pages require you to log in to your account while other needs you to log out.

Please reach us through our support channel if you have questions. 

Filed Under: Development, Help Center, Membership Portal

Membership Portal Query

March 29, 2022 By Rick Hernandez

Use this query to pull in all your members into the Membership Portal.
Note: if the query is pulling in more than 15,000 rows, you will need to shrink the query size by the date created.

Filed Under: Development, Help Center, Membership Portal Tagged With: development, membership portal, query

How to get the SSL Certificate from GoDaddy

September 27, 2021 By Rick Hernandez

Introduction

An important document to obtain nowadays is an SSL certificate for safety and security on the Internet. It certifies ownership of the website, keeps user data secure, and prevents hackers from creating a fake version of your website. Obtaining this certificate is crucial for your website, especially since creating subdomains requires one to carry over throughout the domain name. Here, we explore how to have an SSL certificate through GoDaddy.

Requirements to Get an SSL Certificate

overviewDownload

To use a self–signed SSL/TLS certificate, you must provide the certificate and its private key. You must also include the certificate chain to use a certificate signed by a certificate authority (CA). Your certificate must satisfy the following criteria:

  • 1024-bit RSA (RSA_1024)
  • 2048-bit RSA (RSA_2048)
  • 3072-bit RSA (RSA_3072)
  • 4096-bit RSA (RSA_4096)
  • Elliptic Prime Curve 256 bit (EC_prime256v1)
  • Elliptic Prime Curve 384 bit (EC_secp384r1)
  • Elliptic Prime Curve 521 bit (EC_secp521r1)

The certificate must be an SSL/TLS X.509 version 3, containing a public key and the fully qualified domain name (FQDN). It must also include information about the issuer. The certificate can be self-signed by your private key or by the private key of an issuing CA. A signed certificate by the CA must include the certificate chain when importing the certificate.

Using GoDaddy to Get an SSL Certificate

For the sake of this tutorial, we are using GoDaddy to purchase an SSL certificate. You may use another provider if you do not wish to use GoDaddy.

Assuming you already created an account and purchased a certificate, go to account.godaddy.com/products, and click on Manage. It will show you all the details of the certificate for your subdomain. On the box that says Download Certificate select “Apache” as the server type, and download the ZIP file.

Get SSL Certificate: ZIP file contents
The zip file contains the three certificates; you will need to provide the appropriate key

IMPORTANT! Upon purchasing your SSL certificate, it will give you a private key. Please keep this safe and backed up, as you will need this for uploading the new certificate to your subdomain. This key will not download in the ZIP file.

Summary

Obtaining an SSL Certificate will ensure your guests that you own this website. It also shows that you are committed to keeping their data safe and secure as they do business with you. Your reputation as a business proves when you keep security your number one priority on the Internet. If you have other questions about Internet safety and security, don’t hesitate to get in touch with us.

Filed Under: Development, Help Center, Membership Portal

How to add a subdomain to your portal

September 23, 2021 By Rick Hernandez

Introduction

A neat and well-maintained domain for your website brings tremendous professionalism to your organization in the Internet era. When you have separate sections in your domain, like members, clubs, support, and others, it is recommended to create a separate subdomain to easily navigate to that section. It is easier to navigate to members.domain.### than domain.###/sections/members. In this tutorial, regardless of what DNS provider you have, follow along to create a subdomain. (In our tutorial, we will be using Cloudflare.)

Add a subdomain

This tutorial will use Cloudflare, but if you use a different DNS provider, the process will be the same or near identical, with the exception being your setup of SSL or TLS protocols (certificates for security over networks). 

1. Create a new CName record.

Inside of Cloudflare, go into “DNS” and add a new record. Inside fo the interface, there are options to change the type of record. Change this to “CNAME.” From here, name your subdomain.

2. Grab the target address.

Go into Social Good Software. For this example, since we are making a subdomain for memberships, we went into Development -> Membership Portal -> Settings to find the target link. Copy the link from after the “https://“ to the end. It should look something like this:

00000000-a000-000a-aaaa-000a000a.socialgoodsoftware.com

Add a subdomain: membership portal target address
The beginning of the link should be unique to your organization

Paste this link into the DNS page under the Target box.

3. Configure SSL/TLS Settings.

Configure these settings to generate secure certificates for your website, enabling SGS to work properly with your website. If you have issues with this, since this is unique to each organization, you may need to configure this by contacting support with your DNS provider.

To view how to receive a SSL certificate from GoDaddy, click here or click on the link below.

https://socialgoodsoftware.com/how-to-get-the-ssl-certificate-from-godaddy

4. Configure SEO in SGS

Go back to the Social Good Software app, and go into Development -> Settings -> SEO. Under the Domain Alias on the top right of the screen, type in your subdomain name. In this case, we use “members.codewithintent.com” since we are making a members subdomain. Save settings before closing out of SGS.

Add a subdomain: SEO configuration in SGS App
Add your subdomain to the address in this box

Depending on your DNS provider, finishing your SEO configuration will either instantly make your subdomain live, or it may take longer—a few days maximum—to get everything situated and live.

Summary

Creating a subdomain in your DNS and linking it to SGS helps maintain a professional Internet presence. It gives your users a simple, clean experience working with your organization. Familiarize yourself with your DNS provider, and you can get subdomains up in no time. If you have any other questions, please feel free to contact us anytime.

Filed Under: Development, Help Center, Membership Portal

Social Good Software | Altru software integrations | Deduper | Calendar Builder | Email Designer | Barcodes Reader | Checkout Flows | Membership Portal | Online Template | API Integrations