• Skip to primary navigation
  • Skip to main content

Social Good Software

Creating amazing guest experiences through innovative software solutions for the social good community

  • Features
    • Deduper
    • Calendar Builder
    • Email Designer
    • Barcodes Scanner
    • Online Template
    • Checkout Flows
    • Membership Portal
    • Data Bridge
  • Pricing
  • Contact
    • About
    • Contact
    • Feedback
    • Careers
  • Login
  • Get Price

Calendar Builder

Implementation Guide – Calendar Builder

October 23, 2022 By Hezel Dalimoos

Implementation Guide - Calendar Builder

A complete implementation guide that helps set up your Calendar Builder.  

All procedures in this document are compatible with the SGS app version V1.3.3.

In summary, this document covers the following:

  • Assigning Roles and Permissions in Altru
  • Creation of queries in Altru
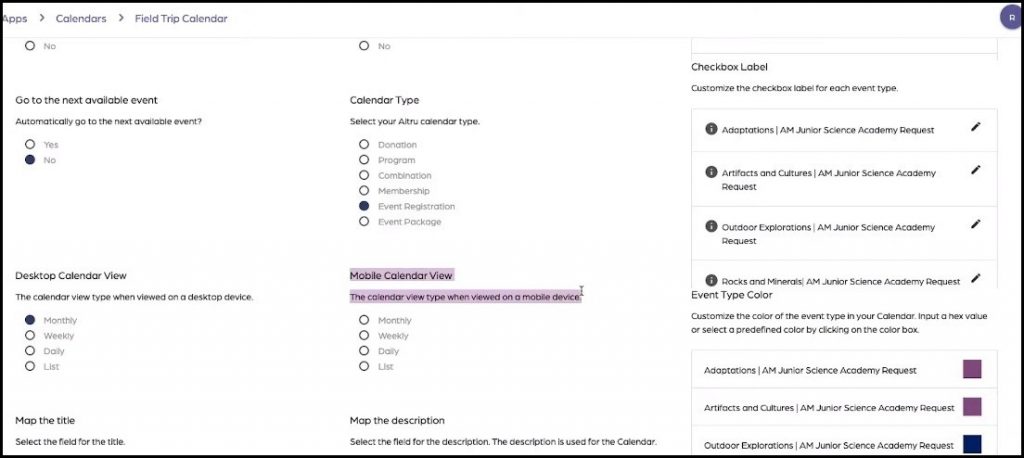
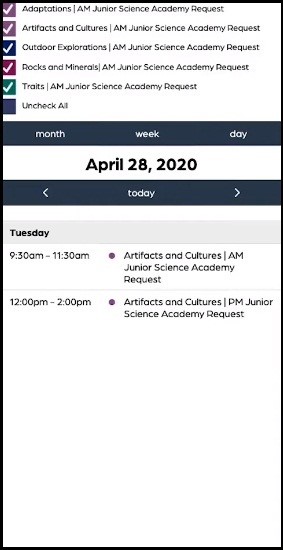
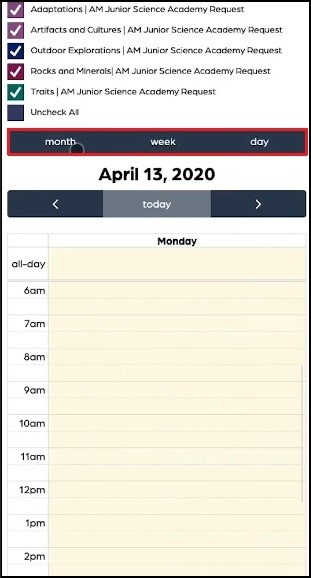
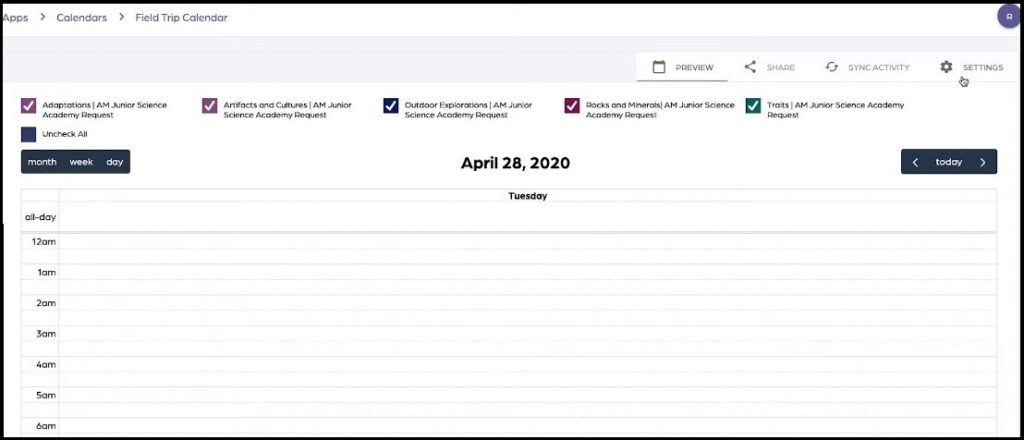
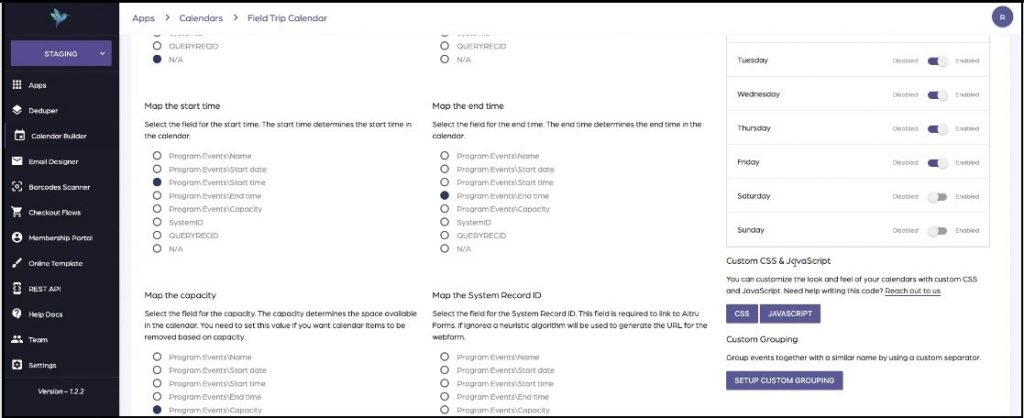
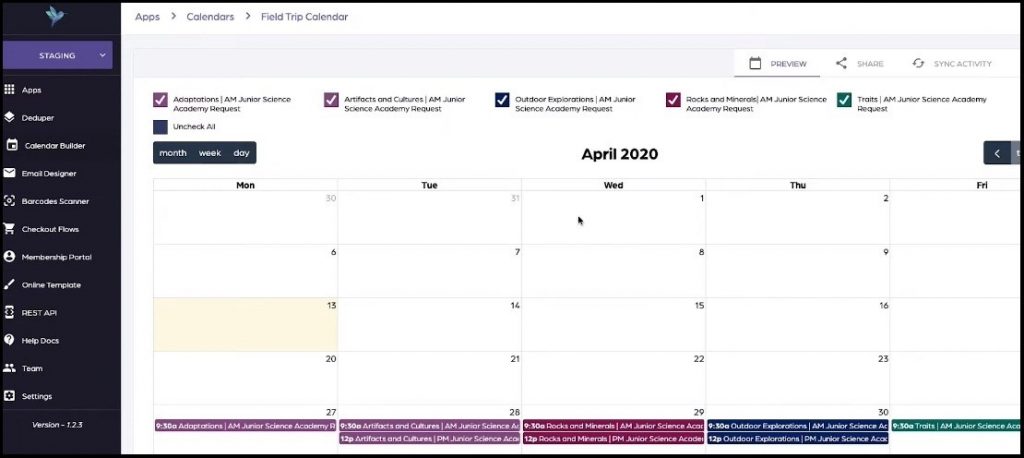
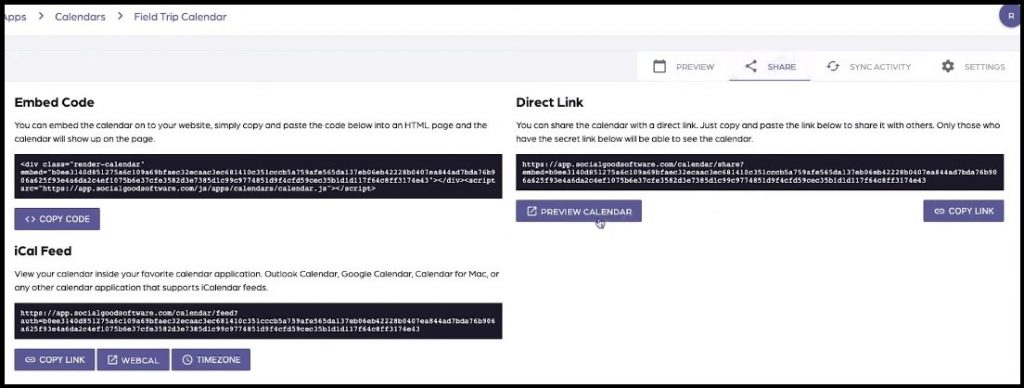
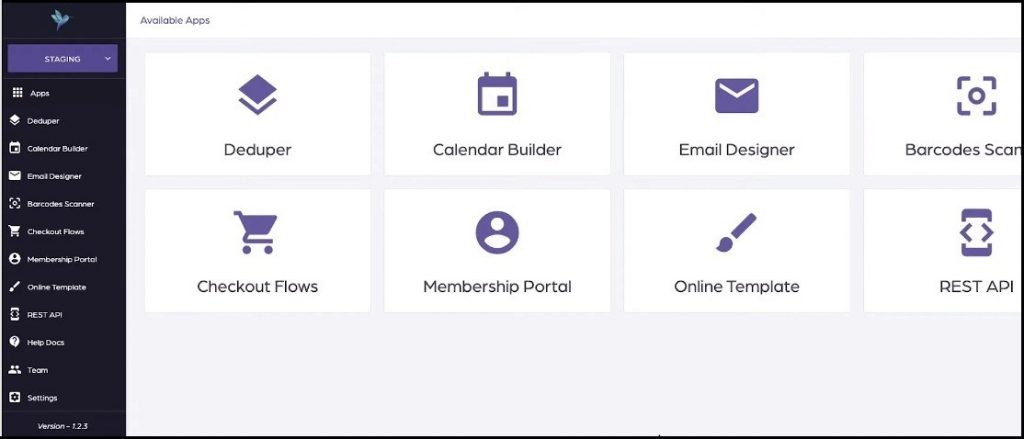
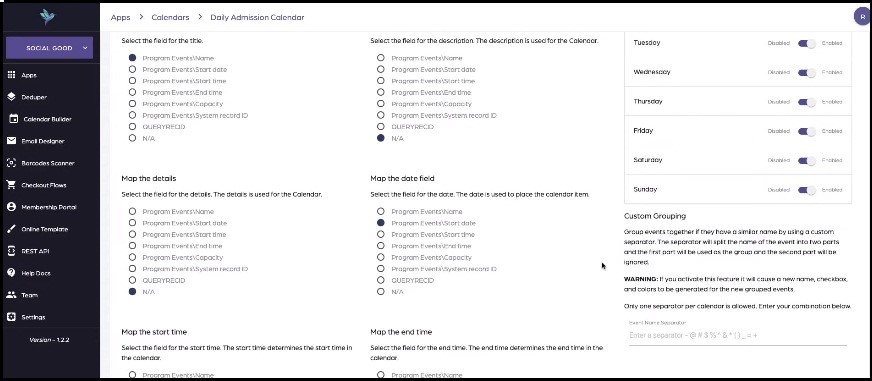
  • Configuring the Social Good Software application (app.socialgoodsoftware.com).

For other concerns and related articles, please visit help.socialgoodsoftware.com or email us at implementation@socialgoodsoftware.com.

Please reach us at support@socialgoodsoftware.com for your questions, clarifications, and other concerns. We are always happy to help!

Filed Under: Calendar Builder, Help Center, Implementation Guide, Implementation Guide

How to add additional programs to the calendar

December 14, 2021 By Rick Hernandez

Calendar Builder of Social Good Software is a tool designed to create calendars from Altru data. It is useful in creating calendars for time ticketing, school programs, and special events. Learn how to add additional programs to your calendar and make necessary adjustments using the Altru query and enjoy the benefit it can bring to you and to your organization. 

Adding Additional Programs to the Calendar

1: Go to your Social Good Software account.

2: Proceed to Calendar Builder and click on the existing calendar where you want to add events.

Adding a program to the query of Timed Ticketing Calendar

1:  Go to Settings and click the query for Timed Ticketing under Events to start and make necessary adjustments.

2: It will redirect you to Altru’s Ad-hoc Query wherein you need to click Edit Definition.

3: You can now enter the program that you want to add to your query:

  • Go to Program Events then under Fields click Name and drag to Includes records where section.
add additional programs to the calendar
  • A dialog box will pop out where you can put the name and criteria of the event you want to add. Click OK. See the sample below.
  • You can now make adjustments to your Event query. For illustration, we made the following adjustments:
    • The newly added event is moved up just after the old one.
    • OR was used instead of AND
    • Added open and close parenthesis () from the beginning of the old event to the newly added event.
add additional programs to the calendar
Note: this is just a sample added event and an illustration of how to properly adjust the said program in a query.
  • Click Preview Results to check if the query with the newly added event is working. Click Save and Close if it is to your preference.

Adding a program to the query of Reserved Events

1: Go back to Calendar Builder. Click on the other query under Reserved Events. This query will show you if the event tickets were sold out or not.

2: Same with the first query, just click the link which will prompt you to Altru’s Ad-hoc Query where you need to click the Edit Definition.

  • Go to Sales Order Item and select Sales Order Item Ticket then Program Events. On the Fields section select Name and add to ‘Include records where’ which will redirect you to a dialog box. Set up the criteria to Contain and put the name of the event you wanted to add. Click OK.
add additional programs to the calendar
  • Back to “Sales Order Item Ticket”. Select “Tickets” and on the “Fields” section drag Status to “Include records where” in which a dialog box will appear. Just set it up as “Equal to Value” and “Active”. You also need to add the Status under the “Results field to display” and add COUNT
add additional programs to the calendar
  • We will make the following adjustments to the query on this example:

Under Include records where:

  • From AND to OR
  • Put open parentheses before the Sales Order Item of the existing event and close parentheses at the end of the added event.
  • Remove Refund status is equal to 0

Under Results fields to display

  • Remove the Quantity
  • Click on Save and Close once all is done and good.

Syncing of Data

1: Back to Calendar Builder. Go to Sync Activity and click on Request Data then another Request Data on the dialog box. This will sync over all the information based on the recently made query into our calendar.

add additional programs to the calendar

2: Once it’s done syncing, proceed to Settings then click on the gear icon and select COUNT(Sales Order Item Ticket\Tickets\Status) before you click Save.

add additional programs to the calendar

3: Click Preview to check your output. From here, your calendar will automatically update on your website if you have it embedded. We ask for your patience when doing this because it takes a minute or two before it reflects on your site.

If you have more questions please reach out to us through our support channel.

Filed Under: Calendar Builder, Help Center, Implementation Guide, Query Examples

How is availability calculated in the calendar?

October 15, 2021 By Rick Hernandez

availability

1: In October 2022, Altru released in this article about a new feature that can be used to query remaining capacity for programs. Feel free to use this field to query the remaining capacity.

You may still refer to the old process of calculating the program availability below.

Calculating the availability in the calendar

Make sure that you already have the Calendar Query which is the output of all program information. This query gives the number of capacity you have set for a specific event.

2: We also need the Reserved Event Query to calculate the number of tickets sold. The query includes tickets that are sold and not refunded. Under this query, we’re outputting quantity.

3: Grab the capacity that was set based on the result of the calendar query less the number of tickets sold and the difference is the availability. This gives us the formula:

Calculating Sold

Use the formula above to calculate the availability but before you do that, determine first the number of tickets sold. We will base the total number of tickets sold on the output given by the reserved event query. The query will display the sales order with the total quantity of tickets for a particular event. You can calculate the number of items sold by taking the sum of all quantities in the output query.

By taking the capacity based on the Calendar Query and the quantity calculated by taking the sum of all quantities displayed on the sales order provided by the reserved event query, you can now calculate the number of availability for a calendar.

Frequently Asked Questions:

  1. What are the reasons for an incorrect quantity displayed on the calendar?
    • The probable reason for an incorrect quantity displayed is refunds, partial refunds, cancellations, rescheduling, and so on. Because of that,  you need to explicitly exclude refunds in your query.
    • Include “Refund status is equal to 0” in your query to acquire data on tickets not refunded. 
    • You can also remove the ‘refund status is equal to 0’ if you wish to include a refund on the calculation for sold.
    • To troubleshoot this issue, you need to output the specific date with a specific time for both queries. After that, you can now calculate the availability.

2. Can I manually override availability and mark it as sold out?

  • Yes, you just need to go to your program and set the capacity to zero (0) and that will automatically pull the items off for you.
  • To remove those partially refunded tickets from your calendar, just go to that particular event date and time and set the capacity to zero.

Filed Under: Calendar Builder, Help Center, Query Examples

How to set up calendar days

August 23, 2021 By Rick Hernandez

Introduction

Calendar Builder is a tool that you can use to create and customize a calendar for internal and personal use. You can also utilize this tool to modify your calendar before sharing it on your website.

When you set it up, you must consider its visual appearance. Making the days with scheduled activities be visible rather than all seven days will make it easy to look up and organize. With this, you can pull off a more sleek and direct look at what events are coming up on what days

Steps on how to set up the calendar days.

1: Go to your Social Good Software account

2: Proceed to the tool.

3: Select which one you want to edit the display date.

4: Click on Settings at the upper right side of the window.

5: Look for the option “Setup Calendar Days” in the second column of the Settings which help you change the days displayed.

6: Click on the gear icon and choose the day you want to display.

7: Don’t forget to save all the changes you made when you are ready to export it.

Summary

Having fully customize option is a great plus for your organization. We hope that you learn more about this tool and take advantage of it to customize, edit, and organize your calendar. As always, if you have any additional questions, don’t hesitate to ask us!

Filed Under: Calendar Builder, Calendars, Help Center

How to configure a window of time

May 2, 2021 By Rick Hernandez

Filed Under: Calendar Builder, Calendars, Help Center

Hide events relative to the current time

May 2, 2021 By Rick Hernandez

Filed Under: Calendar Builder, Calendars, Help Center

How to clear the cache from a calendar

October 9, 2020 By Rick Hernandez

Filed Under: Calendar Builder, Calendars, Help Center

How to add a Timed Ticketed calendar to WordPress

May 29, 2020 By Rick Hernandez

Filed Under: Calendar Builder, Calendars, Help Center

How to setup a list view for calendar on a mobile device

April 13, 2020 By Rick Hernandez

This short tutorial and video will guide you how to set up a list view for calendar on a mobile device.

Why Need a List View for Calendar on a Mobile Device:

A detailed view of calendar on mobile device looks either overcrowded or it has so many blank areas. Hence is becomes very difficult to use on a mobile device. In order to avoid this, a customized list view for calendar on a mobile device is very useful.

Requirements:

A calendar already built by using Social Good Software.

Steps:

1. Click “Calendar Builder” tab on Social Good App. Now click a calendar from available calendars to open the calendar for which you want to set up list view on a mobile device.

2. Click “SETTINGS” on top right of the interface. This will open settings page with many preferences to customize your calendar.

3. Now look for “Mobile Calendar View” preferences. You can select any of the preferences i.e. “Monthly”, “Weekly”, “Daily”, or “List”.

4. Select “List” from “Mobile Calendar View” and press “SAVE SETTINGS” button on bottom right of the screen. Now click “PREVIEW” from top right of the screen to preview list view for calendar on a mobile device.

5. Next click “SHARE” from top right of the screen and then click “PREVIEW CALENDAR” below “Direct Link” to preview the calendar on a different tab. 

6. Now press “SHARE” and then “PREVIEW” to preview the calendar on a mobile device. Now you can preview the calendar on a screen similar to that of a mobile device.

7. You can change the view type such as daily, weekly, or monthly any time by going back to settings just as described in step 3. Now open the mobile view again as described in step 4 and 5 and refresh the view by clicking “…….”.

8. As you can observe, the “daily”, “weekly” or “monthly” views on a mobile device are not as user-friendly as list view. You can also directly toggle between “daily”, “weekly”, or “monthly” view by clicking “day”, “week”, or “month” from mobile view of your calendar.

Filed Under: Calendar Builder, Calendars, Help Center

How to add custom CSS and JavaScript to Calendar

March 20, 2020 By Rick Hernandez

This short tutorial and/or video will guide you how to add custom CSS and JavaScript to calendar.

Why Need to Add Custom CSS and JavaScript to Calendar:

Adding custom CSS and JavaScript enables you to improve the functionality of your calendar to meet your organization’s special requirements and preferences.

Requirements:

An already created calendar using Social Good Software

An already written CSS and Javascript you want to add to your calendar

Note: You can also “Reach out to us” if you need help writing these code.

Steps:

1. Click “Calendar Builder” tab on Social Good App. Now click a calendar from available calendars to open the calendar to which you want to add custom CSS and JavaScript.

2. Click “SETTINGS” on top right of the interface. This will open settings page with many preferences to customize your calendar.

3. Scroll down the settings page and look for blue colored “CSS” and “JavaScript” tabs on the left side of the settings page.

4. Now click “CSS” tab, copy paste the CSS code in “Custom CSS Code” box and press “Save”.

5. Similarly click “JavaScript” tab, copy paste the JavaScript in “Custom JavaScript Code” box and press “Save”.

6. Now click “SAVE SETTINGS” at the bottom left of the settings page and scroll up the page.

7. Next click “Preview” tab on the top right of the page to preview the added functionality of CSS and JavaScript code.

8. Click “Share” tab on the top right of the page and then click “Preview Calendar” and go down to mobile device by shrinking your window down or by using your mobile device to preview the calendar on a mobile device.

Note: Anytime you want to remove/edit the CSS and JavaScript from your calendar go to “CSS” and “JavaScript” tabs and remove/edit the code.

CSS

.render-calendar .container-wrapper {
    max-width: 80%;
    float: left;
}

.render-calendar .checkbox-wrapper {
    width: 19%;
    overflow: scroll;
    padding-left: 1%;
}

@media (max-width: 650px) {
    .render-calendar .container-wrapper {
        max-width: 100%;
    }

    .render-calendar .checkbox-wrapper {
        width: 100%;
        padding-left: 0%;
    }

    .render-calendar .checkbox-container {
        width: 100%;
        max-width: 100%;
    }
}

JavaScript

var checkboxes = $(container).find('.checkbox-wrapper').detach();
$(container).append(checkboxes);
var height = $(container).find('.container-wrapper').height();
$(container).height(height);
$(container).find('.checkbox-wrapper').height(height);

Filed Under: Calendar Builder, Calendars, Help Center

  • Go to page 1
  • Go to page 2
  • Go to page 3
  • Go to Next Page »

Social Good Software | Altru software integrations | Deduper | Calendar Builder | Email Designer | Barcodes Reader | Checkout Flows | Membership Portal | Online Template | API Integrations