• Skip to primary navigation
  • Skip to main content

Social Good Software

Creating amazing guest experiences through innovative software solutions for the social good community

  • Features
    • Deduper
    • Calendar Builder
    • Email Designer
    • Barcodes Scanner
    • Online Template
    • Checkout Flows
    • Membership Portal
    • Data Bridge
  • Pricing
  • Contact
    • About
    • Contact
    • Careers
  • Login
  • Get Price

Email Designer

Membership Card IDs walkthrough

October 14, 2022 By Rick Hernandez

Social Good Software helps you create Digital Membership Card IDs for your organization that your members can download in PDF form and save to their Apple Wallet and Google Pay. To help you set up your Membership Card ID, we will first identify the feature of your membership card and then discuss some variables to understand when to use them.

Membership Card ID Settings

1: View all options available to set up your Digital Membership Card IDs by logging in to your Social Good Software account. Proceed to Development, then Membership Cards. 

2: Click Add Membership Card to create a new card or select the existing Digital Membership Card that you want to set up.

3: You can now view all the options to set up your membership cards. This guide will focus on Membership ID, Constituent Membership ID, and Custom field.
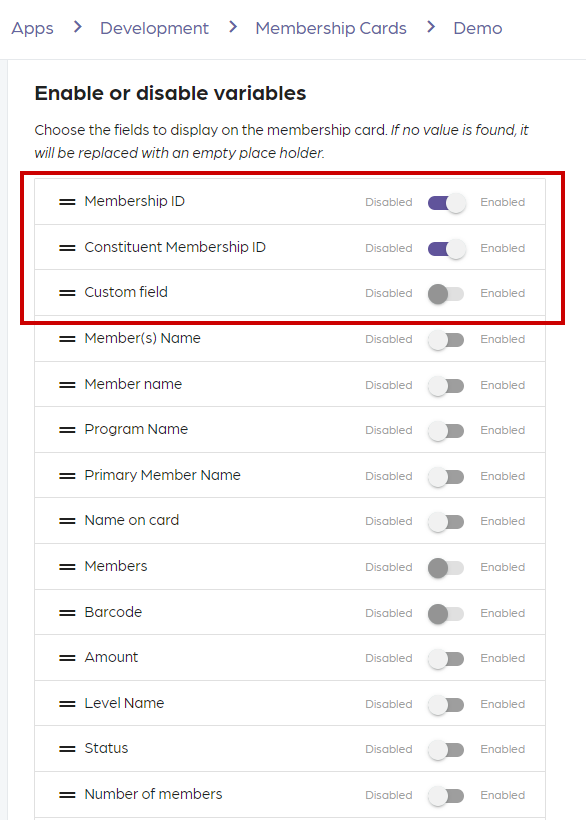
Custom Field

  • It is only available on iOS and android.
  • The value you enter by typing it in (Great for member benefits).
Membership Card IDs
  • Only works on the back of the digital cards (Not the web version)
Membership Card IDs

Constituent Membership ID

  • It is the Look-up ID for the constituent in Altru.
Membership Card IDs
  • We need to reference this as the membership so the label says “Membership ID” even though it’s the lookup ID.
Membership Card IDs

Membership ID

  • It is the value attached to the membership.

We hope this guide helps you distinguish between the two Membership IDs in your Digital Membership Card and be able to determine when you can use the Custom Field. If you have questions, please reach us through our support channel or email support@socialgoodsoftware.com. We are always happy to help!

Filed Under: Digital Membership Card, Email Designer, Help Center

Why am I receiving an email about preventing duplicates from going out?

September 20, 2022 By Rick Hernandez

an email about preventing duplicates from going out

You may have received from us an email about preventing duplicates from going out, just like above.

Why did I receive this?

An email about preventing duplicates from going out automatically gets triggered when the system prevents an email from going to the same person multiple times.

How do I resolve this?

 Check your query. Is it pulling data on or after yesterday, or is it set to pull data from a specific date in the past?

Reasons why this happen: 

  1. Altru was down and not sending information
  2. An error occurred while retrieving the email

To resolve this issue: 

  1. We will need to locate emails that have not automatically gone out. 
  2. Check which email template is triggering this notification. You can do it by clicking on the Email Template link directly in the email. It will redirect you to the correct template.
  3. You need to check your preview tab. If you see any emails with a yellow icon, click on that email. 
  4. Check Altru if there is a note type attached to the constituent record the email address is attached.
  5. If not – you can manually resent the email in SGS by clicking the email and then clicking the Send Test Email button.
  1. A dialog will appear with the recipient’s email address and a checkbox to attach the note type in Altru.
an email about preventing duplicates from going out
  1. In most cases, manually sending these emails will remove the issue.

I have tried that and am still receiving an alert. What should I do?

Please email us at support@socialgoodsoftware.com so we can further look into this. 

Filed Under: Email Designer, Emails, Help Center

How to add content to the Email Designer from Word Document

September 12, 2022 By Rick Hernandez

Email Designer is an easy-to-use tool that helps customize your emails by using its different functions when adding content. It will help you create an email that can align with your organization’s brand and style, which help distinguish your organization from the others. To take full advantage of this application, we prepared an easy-to-follow guide for you:

Reminder: Don’t forget to click the Save button as you continue to work with your email to save your progress.

Guide in Adding Content to the Email Designer

1: Upload images 

  • Before adding an image to your email, see that it is within the standard size the designer supported.
  • Once you have your image ready, grab the image icon from the right side of the Email Designer and place it on the header or anywhere you want it to be in your email.
add content to the Email Designer
  • Double-click the default image and select the image you want to add. 
    • Click upload image twice to add pictures from your computer’s local drive.
    • Double-click the image once uploaded to add it to your email.
add content to the Email Designer

2: Create images for the email design with size restrictions.

  • If you prepared an image with a size bigger than the one required by the email designer, screenshot your favorite part of the image to adjust its size and add it to your email, rather than adding the whole picture that will eventually get cropped.

3: Copy and paste content

  • You cannot copy and paste formatted texts from word documents to Email Designer, so use the following command to paste without formatting:
    • MAC: Command + Shift + V 
    • Windows : Control + Shift + V 

4: Reformat Plain Text

You can reformat plain texts by selecting the word/s that you want to edit, then use the following functions: 

add content to the Email Designer
  • For more functions to edit texts, proceed to the upper right side of the designer and click Style Manager.
  • Style Manager > Dimension
    • Under Dimension, you can adjust the distance of each element in your email.
  • Style Manager > Typography
    • Typography helps you change and adjust the font you use in your email. It also has the option to change your font color, style, alignment, and spacing.
  • Style Manager > Decorations
    • It is to change the background of the texts.

5: Add a button

  • On the upper right side of the designer, open Blocks and click and drag the Button icon to the place you want it to be in your email.
  • Go to Typography under Style Manager to edit the font style and color of the button and Decorations to change the background and border color. 

6: Add bullet points and links.

  • Double-click the text box to make some functions for text formatting appear. You can insert or remove bullets by clicking the bullet function. 
Note: Currently, Email Designer does not support bullets under bullets.
  • To insert a link, you have to highlight the text/s and click the link icon or do the command ctrl+L. A dialog box will pop out where you can add the link under the URL. 

7: Test the email sending

  • Proceed to the Preview tab to check the actual email you just created. You can also send a test email to your email address to see if all are set and ready.
  • To send a test email, go to the Preview tab, then scroll down to the bottom to click the Send Test button.
  • A dialog box will pop out where you can add your email address for the test email.
  • Check your email address for the final output so you can make necessary adjustments to your email.

Your email is now ready to send out. Please reach our support channel if you have questions or clarifications about this topic. We are always happy to help!

Filed Under: Designer, Email Designer, Help Center

How to add digital membership cards to your email

June 29, 2022 By Rick Hernandez

Requirements:

  • You have an email created in Social Good Software.
  • You have written a query for your email that include these two (2) required fields:
    • Members\Constituents\First name
    • Members\Constituents\Constituents Record.

Note: There are two first names in the output fields because the first one is for the body of the email and the other one is for the linked digital membership card.

  • You already assigned a membership level to a membership card.

Adding digital membership cards to your email

1: Go to the Email Designer. Click on the email template you prepared and proceed to Settings. 

2: In Settings, you need to set up the Required and Customizations sections properly. Make sure each item has a green check next to them cause it indicates that you have already configured it correctly.

Adding digital membership cards to email

3: To create the digital membership card link, first, click on the little gear in the Grouped Fields section and enable the following:

  • Members\Constituent\First name
  • Members\Constituent\System record ID
Adding digital membership cards to email

4: Proceed to the Grid section for the merge field of the first name and the link to the digital membership card. Select the Grid and click on the Load default for the merge field and the link to show up. Save once done.

Adding digital membership cards to email

5: Save the changes you made in the Settings and proceed to the Designer tab.

6: On the lower left side of the window, click on the Grouped field dropdown. Drag the %grid% into the body of the email and Save.

Adding digital membership cards to email

7: Go to the Preview tab to check the changes made to the email. You can also try the membership card link if it works.

Adding digital membership cards to email

Summary

Grid allows us to create a link to digital membership cards for each member on membership and add it to the email. The email is going to the primary member, so we want to display all the members who are part of that membership. In that way, all members can download their digital membership card.

Contact us through our support channel if you have any questions.

Filed Under: Email Designer, Emails, Help Center

How to handle the delivery of emails, bounced emails, and complaints

June 20, 2022 By Rick Hernandez

Introduction

There are times that when sending out emails with the Email Designer, some of them might get delivered, bounce, or have a complaint filed. It can happen for a few reasons, but the most common is not getting the correct email addresses at the time of purchase with Altru. We recommend that you set up the email validation service with your Altru account and follow this guide on how to handle the delivery of emails, bounced emails, and complaints to manage any email concerns you have accordingly. 

Bounce messages

Sending emails through Email Designer is not always perfect. At times it will bounce because of various reasons like invalid email addresses due to typos, the account is no longer active, or an incomplete email address. You can handle bounced emails by following the steps below.

1: Go to your Social Good Software account and proceed to Email Designer.

2: Click on the email template you want to set up and proceed to Settings.

3: Whenever an email bounces, it will go back to the From Email Address with a notification containing details of why the email bounced and other information you might need. You need to monitor the origin of your emails to capture bounce messages and correct them.

How to handle bounced emails and complaints
Bounce message notification

4: Click the Resend Email link. It will redirect you to the email you are trying to send to your customers. You can also see the status of your email and information related to it.

How to handle bounced emails and complaints

5: You can resend the message and correct the recipient’s email address by clicking the Send Email button. A dialog box will pop out where you can type in the correct email address and click Send Email. With this, you will be able to send the email to the appropriate person and correct any mistakes before the message goes out.

6: You can check your recent email sent by going to the Activity tab.

How to handle bounced emails and complaints

Complaints

There is a chance that your email sent is flagged as spam. It might happen because the recipient did not give their consent to receive this kind of notification, the information is not relevant to the person, or you sent the email to the wrong email address. We recommend doing an email validation before your customers submit their orders. That way, you can avoid delivering the email to the incorrect email address.

Go to the Activity tab to check if the email you sent was delivered. The From Address in your email template will always receive the complaint notification where you can check the complaint details.

How to handle bounced emails and complaints
Complaint email notification

Resending email

There are circumstances when customers ask for help because they can’t find their tickets or did not receive a reminder. Learning how to resend an email using the Email Designer will be helpful in this situation.

1: Go to the Activity tab of the Email Designer.

2: Click on the calendar and select the date you sent the email.

3: Do command+F for MAC or Ctrl+F for Windows. Type in the email address you are looking for, and click on Resend Email.

4: another way to resend an email is to go to your query in Altru and remove the note type on the sales order so that it will kick off a new email. Note that if the email address is wrong, it will still be delivered to the incorrect email address. 

Note: Only original emails that you sent out are the ones attached to Altru

Summary

We emphasized that you check the origin of your email or the From Email Address. That way, you will know if there are undelivered emails, bounced emails, or complaints and handle them appropriately. Please reach us through our support channel if you have questions or clarifications.

Filed Under: Designer, Email Designer, Help Center

How the relative to date email setting works

May 26, 2022 By Rick Hernandez

Do you have members who auto-renew more than once? Or a monthly membership program that requires an email to go out to members monthly? Keep on reading to learn how to use the relative to date frequency option in your email settings to send the same email on a specific date you want it to be. 

If you want to use the relative to date option for an email, you will need a specific date like the date of the membership renewal, the date of purchase, or anything with a date. We recommend that you use the auto-renew query prepared by Social Good Software.

Note that there are many kinds of emails with different purposes based on the needs of an organization, so Social Good Software supports three types of emails. 

Email Frequency settings 

You can find the Email Frequency settings on the email settings page under the option Frequency. The frequency automatically defaults to sent out immediately.

1. Frequency – Immediately 

  • This option will send the email immediately after you create it. 
  • The immediate option requires a note type in the query to know that you sent out an email.

Learn about how to create a note type for a sales order query

2. Frequency – Specific time 

  • You can set the time when you want your emails to go out. 
  • Note type is also needed to know that you sent an email at a specified time.

Learn about how to create a note type for a membership query

3. Frequency – Relative to date 

  • You need to add to the query specifically on the output fields the purchase date, transaction date, expiration date, or another Relative Field. 
  • This option does not require a note type in the query but needs a date like the renewal date, date of purchase, and so on to send out an email relative to the date.
  • A note type is still required in the email settings to create a note in Altru that the email already went out.

Do you need to email the same person multiple times?

Read How to bypass a single email limit per email type.

Summary

Sending emails can be at the very moment, at a specific time, or relative to date. Depending on which frequency option you select, you will either need a note type in the query or a date in the output field.

If you have additional questions, please reach us through support@socialgoodsoftware.com. We are always happy to help!

Filed Under: Email Designer, Emails, Help Center

Auto disable emails when queries change in Altru

May 25, 2022 By Rick Hernandez

  1. Prevents you from making mistakes with queries which could end up emailing the same person multiple times
  2. Auto turn off the email for you so you have time to review the changes on the query
  3. Notify you of the change and to which email the change was made
  4. View the history of the changes in the SQL using an excel or CSV file

Summary

We recommend temporarily disabling the email before making changes to the query to not receive alerts and so they won’t get turned off automatically. Once disabled, you can modify and review it before re-enabling it again.

Filed Under: Altru, Email Designer, Help Center

How to add the eTicket link to the default acknowledgment email in Altru

April 26, 2022 By Rick Hernandez

How-to-add-eTicket-email-to-the-default-acknowledgement-email-compressedDownload

In this guide, you will be able to learn how to add the eTicket link to the acknowledgment email in Altru. With this,  your constituents will be able to download and check it easily as it was already in the transactional email sent to them.

Steps on How to Add eTicket Link to the acknowledgment email

1: Go to your Altru account and proceed to Web.

2: Click on Default acknowledgment email.

how to add the eTicket link to the acknowledgment email

4: A dialog box will pop out that helps change the link into an e-Ticket link inside the email.

5: You can add the link anywhere you are comfortable inside the email. For illustration, we will add this link below the Receipt Grid.

6: Add the merge field by going to Insert and clicking the merge fields.

how to add the eTicket link to the acknowledgment email

7: A dialog box will pop out in which you need to click on Summary > eTickets.

how to add the eTicket link to the acknowledgment email

8: From the dialog box under e-Ticket, drag the Begin link to the e-Ticket page and drop it at the beginning of Download eTicket. Same with the End link to the eTicket page, but drop it at the end part.

9: Once done, click on Save.

The link to your e-Ticket is now added to your transactional email. If you have more questions or clarifications please reach out to us through our support channel.

Filed Under: Altru, Email Designer, Help Center

How to enable email automation

April 16, 2022 By Rick Hernandez

If you are done with your emails and are now ready to send out all your outbound messages, the email automation of Email Designer is very helpful. All you have to do is to enable the automation function for it to send messages on your behalf. Make sure you follow the steps below for the best result.

Email automation process:

1: Log in to your Social Good Software account.

Screenshot

2: Click on the Email Designer on the left side of the navigation.

3: Find the email template where you want to enable the email automation function. In this example, we will be using Tickets Sold Today.

4: Click on the “Settings” option on the upper right side of the window.

email automation

5: In the settings section, you will see the option “Start sending emails?”. Enable this function and click on the “Save Settings” button.

email automation

6: You can go to Preview to see all the emails you are currently sending and the Activity tab for the emails already sent out.

email automation

Summary

Before you turn on the email automation function, make sure that you troubleshoot it first. Double check your email and edit it if necessary. Once the automation function is enabled, the Social Good Software will monitor the query you built and send out emails every 5 minutes on your behalf.

Please reach us through our support channel if you have concerns or questions. We are always happy to help!

Filed Under: Email Designer, Emails, Help Center

eTicket email Query for Altru

April 11, 2022 By Rick Hernandez

eTicket email Query
E-Ticket Query Example with Altru
eTicket email Query
IMPORTANT: You must include the note type

Filed Under: Email Designer, eTicket Queries, Help Center

  • Page 1
  • Page 2
  • Page 3
  • Interim pages omitted …
  • Page 6
  • Go to Next Page »

Social Good Software | Altru software integrations | Deduper | Calendar Builder | Email Designer | Barcodes Reader | Checkout Flows | Membership Portal | Online Template | API Integrations