• Skip to primary navigation
  • Skip to main content

Social Good Software

Creating amazing guest experiences through innovative software solutions for the social good community

  • Features
    • Deduper
    • Calendar Builder
    • Email Designer
    • Barcodes Scanner
    • Online Template
    • Checkout Flows
    • Membership Portal
    • Data Bridge
  • Pricing
  • Contact
    • About
    • Contact
    • Feedback
    • Careers
  • Login
  • Get Price

Online Template

How to preview pages with the Online Template

February 2, 2022 By Rick Hernandez

Online Template is an easy-to-use tool to customize your web forms. In this documentation, we will discuss how to use the tool and its available components. Also discussed is how to preview pages with the Online Template without swapping out those web forms in Altru and before these forms go live.

With this tool, you will be able to preview your web forms and anything that is being sold online. Remember that this is just a preview. Not everything works as it would be in the production because there are limitations. 

We will not be able to show you exactly everything from checkout to cart and confirmation to the credit card but we can show you the first part which is the checkout side. When you are already in this step, the remaining work is for you to preview the pages and make sure that everything looks good and meets your expectations before we move forward.

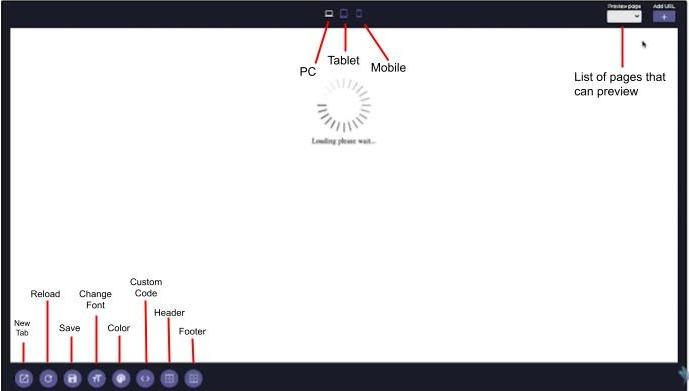
Online Template Designer

It was already a pre-configured tool but if you want to make changes, you can use the little icons below. 
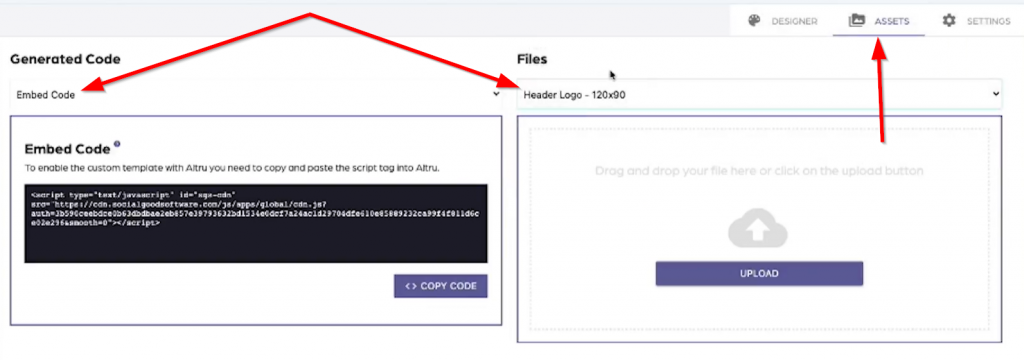
Assets

You can upload your favicon, logo for your header and footer, background, and things like that.  You also have the option to upload custom fonts and embed codes to generate CSS code, header code, and footer code.
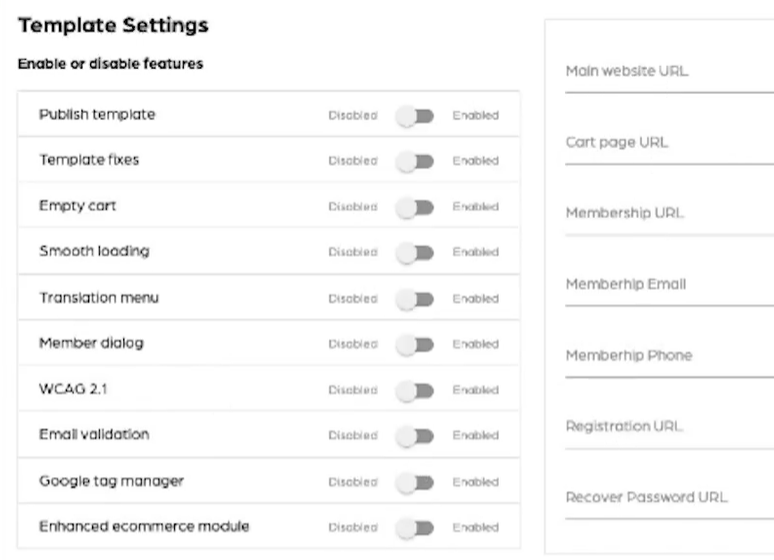
Settings

Below are the options that you can turn on if you want to include values but the SGS team is the one responsible for this, however, if you want to confirm email addresses, URLs, and things like that, you can go here to check it out.

Preview pages with the Online Template

Step 1: Copy the URL of the page that you want to preview from Blackbaud.

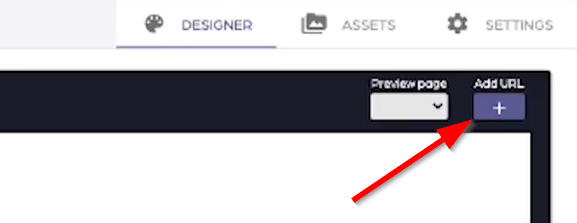
Step 2: Go back to the Online Template tool and click on Add URL.

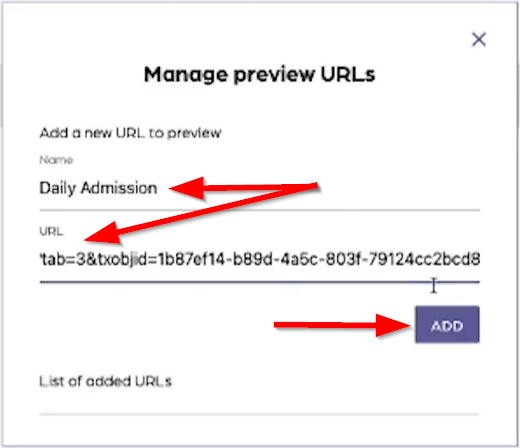
Step 3: A dialog box will pop out where you can type in the name of the page and paste the copied URL then click Add.

Step 4: On the Preview page there is now an item added. Wait until the designer loads the page for preview which will take a while. Essentially what we did is downloading the page from Blackbaud, apply all the stylistic changes then preview the page.

Step 5: You can click on the Save icon at the bottom and wait as the designer loads the page. In this case, there are no changes applied yet so the page loaded to the designer is totally identical to the Blackbaud. But if you click on the new tab icon, the URL is totally different from the Blackbaud so you can now actually share this link with your colleagues to preview. 

Step 6: Let us try to apply some fixes to the webform and see what it looks like. On the Setting side, we will enable the following:

✅Template Fixes
✅Translation menu
✅Empty Cart
✅Member dialog
✅WCAG 2.1
✅Email Validation

Step 7: Go back to the designer and wait as it reloads the preview. Click on the new tab icon to better see the changes made and make adjustments accordingly.

You now have a better understanding of how Online Templates work. The purpose of this documentation is not to configure the template but to show you the process of adding different pages to preview and make necessary changes before your web forms go live.

Filed Under: Guides, Help Center, Online Template

Test Post‘ & – ‘&-

January 30, 2022 By Valerie Magbanua

Test post only. Please disregard. ‘ & –

Filed Under: Guides

How to backup your Altru website

January 25, 2022 By Rick Hernandez

It is important that you backup your Altru website to help you recover from unplanned events that result in primary data loss or corruption.

We highly recommend that you do back up because it is very helpful specially if you are working on any online template and checkout flows. If you want to make sure that you do the back up of your Altru website correctly then refer below.

We created a step by step guide on how to backup your Altru website that you can follow. This process is done using Mac but also applicable with Windows though you need to use a different program.

Step 1: Go to your Download Folder and create a new Folder name Backup

Step 2: Open your newly created Backup folder and add the following files:

  • Open your Text Edit or Notepad > Name it Header.html > Save > Use html.
  • Open another Text Edit or Notepad > Name it Footer.html > Save > Use html.
  • Open another Text Edit or Notepad for the third one > Name it Style.css > save > Use css.
  • Another Text Edit or Notepad which you can use as a reminder of what you have done already. You can name it README.md (markdown) then click Save.

Step 3: Proceed to your Altru account and go to the Web.

Step 4: Click on Page Designer and make a backup of the Layout.

  • Under Select Layout, copy the Header and Footer, Responsive.
  • Go to your Readme.md Text Edit or Notepad then paste the layout name like this: Layout: Header and Footer, Responsive. Save and close. 

Note: The layout might not match this sample but no worries since this is simply a backup.

Backup Style

Step 5: Go back to Select Layout and click Next which will prompt you to the Colors & Styles tab. Select  Advanced colors and styles then click on the Edit style sheet.

  • Click your cursor inside the box and do Control A for Windows or Command A for Mac. Select all the CSS then copy and click on the Cancel at the bottom.
  • Go to your Style file and paste the copied CSS. Once done, click on close because this already backs up all your CSS and proceed to the next step.

Backup Header

Step 6: Go back to Colors & Styles then click Next. This will prompt you to Configure Content tab where the header and the footer are. Proceed to the little gear for the header on the top left of the box. Thi will lead you to the header design where you need to click on View then Code.

  • Select the whole html code using control A for windows or command A for Mac and do control/command C to copy then click on Cancel.
  • Find your Header file and paste the html code for your header. Once done, click close then proceed to the next step.

Backup Footer

Step 7: Go back to Configure Content, scroll down to the bottom and click on the little gear for the footer.

  • Same as the header, click on View then Code. Using Control A for Windows or Command A for Mac, select all the html code for the footer and copy using Control C for Windows or Command C for Mac then click on Cancel and close the open files.
  • Find your Footer file and paste the copied html then close.

Step 8: You now have your backup account so if you ever need to restore your template, you can by going to your backup files.

At this point, we highly recommend that you email all these files to support@socialgoodsoftware.com so that we can back it up and have access to it if needed. We also encourage you to back it up to your local storage, cloud storage or to any storage that you have access to just incase we need it in the future.

Filed Under: Altru, Help Center, Online Template

How to enable price types with Altru

December 14, 2021 By Rick Hernandez

Filed Under: Altru, Help Center, Online Template

How to create a GTM account with Google

November 9, 2021 By Rick Hernandez

Introduction

In this tutorial, we walk over how to create a GTM account, which gives users the ability to add and update website tags for conversion tracking, site analytics, re-marketing, and others.

Create a GTM Account Steps

Step 1: Create a google account but if you have an existing account then just sign in

Step 2: Proceed to this website : https://tagmanager.google.com 

Step 3: Click on CREATE ACCOUNT.

Step 4: You will be directed to Add a New Account form, which needs to be filled in based on the organization’s data. Once done, click Create.

Step 5: You will be sent to Google Tag Manager Terms of Service Agreement. Read the Agreement and click YES if it is acceptable.

Step 6: The Google Tag Manager Account will install and complete the process. Click OK when it finishes.

Step 7: Along with the Google Tag Manager account creation comes the Google Tag ID which needs to be set-up. Take note of this ID, and send it over to Social Good Software. 

Step 7.1: In order for Social Good Software to work on your Google Tag Manager Account, send an invite to SGS by going to Admin > User Management.

  Step 7.2: Click on Add > Add users.

Step 7.3: Add the email address for Rick–Founder of Social Good Software–and check on the Administrator and User permission checkboxes, just in case he needs to invite the rest of the SGS team.

Step 7.4: Click on Read to change the permissions. Check on Publish, Approve and Edit, then click Done. 

Step 7.4: Proceed to Set All to give more permissions and enable Publish, Approve and Edit. With this, Rick and his added team can make changes in both container level and web level.

Step 7.4: Lastly, Click on Invite. Rick receives an invitation which will give him authority to invite his team members to help configure your Google Tag Manager Account and set it up properly.

Conclusion

Hopefully, this process helps with setting up a Google Tag Manager account to give greater SEO Improvements with your business and website. Because Rick is on-board with your account, make sure to contact him and his team with any other questions.

Filed Under: Google Analytics, Help Center, Online Template

How to update phone number or address with Altru

September 7, 2021 By Rick Hernandez

In your web forms, you create all kinds of methods for your guests to purchase tickets, edit membership details, and so on; however, what if you have a change of address or phone number with your own company? You will need to go into Altru to update the phone number or address, which we will walk through in this tutorial. It’s time to dive into Altru and edit that form!

Steps to Update Phone Number and Address

  1. Navigate to the Web Form to edit. Enter into your Altru account, then click on “Web” on the Navigation Bar on the top of the screen. Click on Page Designer, then navigate to “Configure Content.” Scroll to the bottom of the dialog box, and locate your contact information in a textbox. Click on the gear that pops up on the top left of the text box. Click on the “View” tab, and edit the code.

The navigation to this place looks like this:

Altru Home Page > Web > Page Designer > Configure Content > Gear on Contact Info textbox > View > Edit Code

  1. Search for the information to edit. For ease of finding the information, press Ctrl + F (Windows) or Cmd + F (Apple) to find the code where the phone number or address is. After locating the information to edit, place the new phone number or the new address into the box. Make sure to save your information before clicking out of the box.
    1. Why do we do this? Can’t I just edit the information from the Configure Content tab?
      You could do that, but doing so would remove the link attributes, meaning that clicking or tapping on the phone number would not automatically call the number or navigate to the address. Keeping a link would give ease of access to guests when they want to call the number or navigate to the address.

Summary

Hopefully, editing these forms through Altru will help make organizational changes easier to perform. These edits will make your web forms and website consistent throughout. If you have any other questions on how to use Altru or SGS, please contact us. We are more than happy to help!

Filed Under: Altru Users Group, Guides, Guides, Help Center, Online Template

Language File

April 12, 2021 By Rick Hernandez

You can setup and configure custom language for your online template using the language file. You can customize all parts of the online template, just provide feedback for us directly on the language file shared with you.

Filed Under: Help Center, Online Template, Prototype

How to validate address in realtime with Altru

January 8, 2021 By Rick Hernandez

Address: We use a third-party tool to validate addresses against the USPS database then we give a recommendation to the user to use the address or not.

Filed Under: Database, Help Center, Online Template, The Best Practices For Nonprofits

How to validate email addresses with Altru in realtime

January 8, 2021 By Rick Hernandez

Email Address validations with Altru: We check MX records to make sure there is a deliverable address we can send messages to and then show a message if it’s a valid or invalid email address.

Filed Under: Database, Help Center, Online Template, The Best Practices For Nonprofits

How to leave feedback on a prototype

July 14, 2020 By Rick Hernandez

Filed Under: Help Center, Online Template, Prototype

  • Go to page 1
  • Go to page 2
  • Go to Next Page »

Social Good Software | Altru software integrations | Deduper | Calendar Builder | Email Designer | Barcodes Reader | Checkout Flows | Membership Portal | Online Template | API Integrations