
Creating amazing guest experiences through innovative software solutions for the social good community
Enable your price types with Altru to help encourage your members and guests to avail of your tickets online. Ticket price is one of the information they want to know before they decide to buy, so see to it that you enable the setting for particular ticket types to make the price available online.
1. Go to your Altru account, then proceed to Tickets.

2. Under Configuration, click Sales methods.

3. Select Online Sales.

4. Proceed to the Price Types tab.

5. Select the price type you want to enable, then click Allow price type.

Your ticket price is now available on your Online Sales. Try this if you have trouble with your web forms to be able to show your price type online.
Please reach us through support@socialgoodsoftware.com if you have questions or need clarification on this topic. We are always happy to help!
Calendar Builder of Social Good Software is a tool designed to create calendars from Altru data. It is useful in creating calendars for time ticketing, school programs, and special events. Learn how to add additional programs to your calendar and make necessary adjustments using the Altru query and enjoy the benefit it can bring to you and to your organization.
1: Go to your Social Good Software account.
2: Proceed to Calendar Builder and click on the existing calendar where you want to add events.

1: Go to Settings and click the query for Timed Ticketing under Events to start and make necessary adjustments.

2: It will redirect you to Altru’s Ad-hoc Query wherein you need to click Edit Definition.

3: You can now enter the program that you want to add to your query:


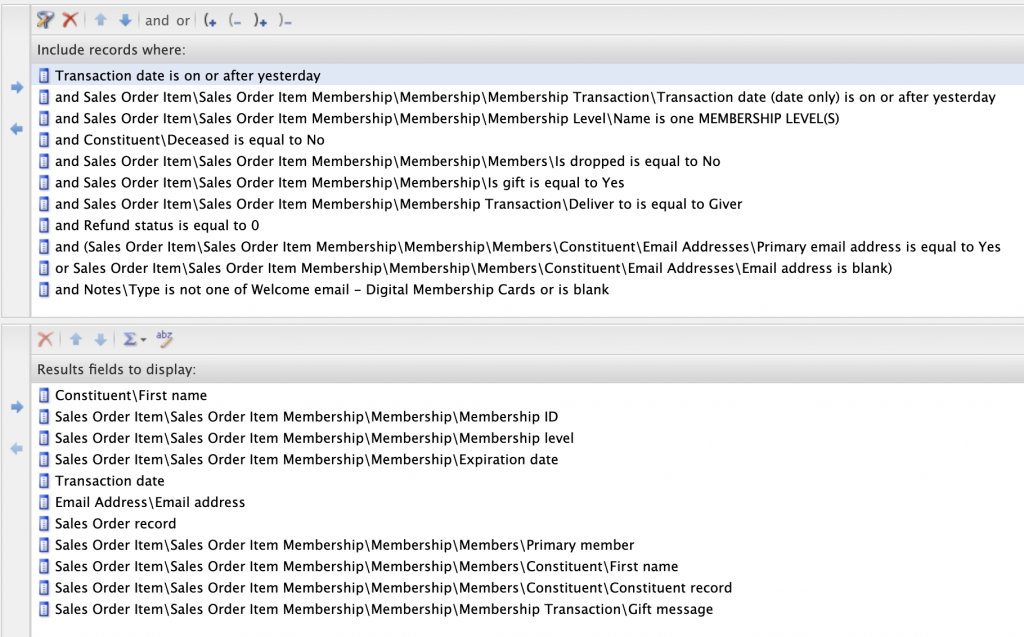
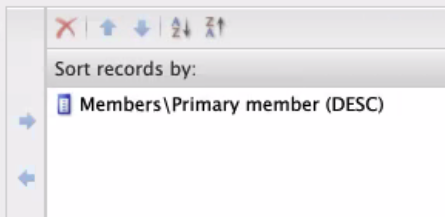
1: Go back to Calendar Builder. Click on the other query under Reserved Events. This query will show you if the event tickets were sold out or not.

2: Same with the first query, just click the link which will prompt you to Altru’s Ad-hoc Query where you need to click the Edit Definition.


Under Include records where:
Under Results fields to display
1: Back to Calendar Builder. Go to Sync Activity and click on Request Data then another Request Data on the dialog box. This will sync over all the information based on the recently made query into our calendar.


2: Once it’s done syncing, proceed to Settings then click on the gear icon and select COUNT(Sales Order Item Ticket\Tickets\Status) before you click Save.


3: Click Preview to check your output. From here, your calendar will automatically update on your website if you have it embedded. We ask for your patience when doing this because it takes a minute or two before it reflects on your site.
If you have more questions please reach out to us through our support channel.
It is very useful to create a membership Note Type for your queries. You can utilize it for any queries like manual tagging, sending emails for batch orders, and sending emails for advance, daily, and online sales.
1: Go to your Altru account and click on Administration.

2: Proceed to Code Tables

3: Under Code Tables, click on Filters. On the drop-down menu, select Membership and click on Apply. It will then bring you to the list of Membership categories for the Code Tables.

4: Click on the Membership Note Type.

5: On the Membership Note Type Table Entries, you need to click the Add button.

6: After clicking the Add button, a dialog box will appear where you can write down the kind of Note Type you are creating. Click OK.

7: Well done! You now have your Note Type. Add more by clicking the Add button and doing the same process.

You can also check the guide on how to create a SYNC Operations note type to learn more about creating a note type.
Please reach us through our support channel if you have questions or clarifications. We are always happy to help!
Below is a detailed process of creating a list that can sync over to either Constant Contact or Mailchimp. Take note that you will undergo the same process of creating a list of individuals whether you are using Constant Contact or Mailchimp and whether it is the main list or a sub-list. Make sure to include all the recommended information whenever you create a query for a mail provider.
The process starts by creating an attribute needed for the query and then going through the process of creating the query itself. Refer below to fully understand the process and to know what are the needed information:
1: Go to Altru and click on Administration then proceed to Attribute Categories.


2: Click Add which will prompt you to a dialog box.

3: Make sure to create a category for a specific segment and if you have a sub-list then you need to tag it differently. Supply the needed information in the Dialog Box based on the details below before you click Save.
Name: Base it on the particular segment you are working on
Record type: Constituent
Data Type: Yes/No
Make sure to ✅ Allow only one per record.

Note: You can add sub-lists as you want which is based on the main list but it still needs to undergo the same process above.
1: After creating the Attribute, you can now proceed to Analysis and click on the Information Library.


2: Click on Add an ad-hoc query which will redirect you to another Dialog Box.

3: Select Constituents then click OK.

4: You can now add fields to your query. Below are the recommended fields needed to make the syncing of information with Mailchimp or Constant Contact work. Just note that if you have a segment that you want to create, all you have to do is to follow the same process but make sure to include the specific segment you are working with.


Note: You can rearrange the fields based on your preference.
5: Click on the Set save option to name your query, write a description, select its category and designate a folder then Save and close.

6: Great! You have officially created a query. You can now use the OData Link with the Data Bridge.

To add a specific segment to your query, you need to go through the same process and add the particular segment you want to include. You can also go to Edit Definition if you already have an existing query and add the specific segment.
1: Go to Edit Definition and proceed to Attributes.

2: Double click the sublist that you want to include.
3: Select Value before dragging it to the Results field to display.
4: Lastly, add the logic applicable for your sublist.

You now have your attribute and a query for your mail provider. If you have more questions please reach out to us through our support channel.
It is a great relief and assistance to have a portable scanner that can do continuous scanning during events where guests are coming non-stop. A stand-alone app that can help validate tickets and membership cards without using wifi or any extra tool or hardware.
Our SGS Barcode Scanner is a downloadable app designed to function in any mobile phone and tablet brand. It can scan tickets and membership cards even in remote places with limited power supply or areas without podiums effortlessly and trouble-free. SGS Barcode Scanner can get you an attendance count without effort and check for a guest through the visitor’s name, email, or phone number. It can track history and provide analytics of visitors too.
Just install the SGS Barcode Scanner on your phone or tablet and use the camera to start scanning. You can also enable the continuous scanning option on your SGS account and connect your gadget to a portable scanner to scan tickets and membership cards.
This app can communicate with Altru so rest assured that all the information from the SGS Barcode Scanner will sync over to Altru.
Below is a detailed guide to set up the app on a mobile phone and tablet and directions on how to use it continuously using a portable scanner. Follow the steps to ensure that no problem will arise in using the Barcode Scanner.
Step 1: Go to Settings and proceed to the following:
a. Battery – turn off the Battery Saver to make the phone stay on.

b. Display – proceed to Advance and go to Sleep then set it to Never or 30 minutes

c. Security – click on Screen Lock Settings and set the Automatically Lock to Never or 50 minutes

Step 2: Make sure that you have the latest version of the SGS Barcode Scanner by checking the app in the Google Play Store if there’s an update button.

Step 3: You can open the app once it is updated and start using it to validate tickets and membership cards. You can also enable continuous scanning on your SGS Barcode Scanner Account dashboard and use a hardware scanner to scan continuously.

Step 1: Same with the android Phone, you need to go to Settings of your tablet and set the following:
a. Go to Display and set the Screen Timeout to 30 minutes.
b. Proceed to Screen Saver and set to nothing.
c. Next, turn off the Battery optimization.
d. Finally, go to Biometrics and Security then click Other Security Settings and check if everything was set.
Step 2: Proceed to Google Play Store and check if the app is on its latest version. Click on update if needed.

Step 3: Open the app once it’s done updating. It will then ask permission to take pictures and record videos, just click on ‘While using the app’.

Step 4: Enter your app ID then Login.

Step 5: After you enter the app ID, the Barcode Scanner is now ready to use. You can choose to scan tickets and membership cards using the camera of your tablet or connect the device to a portable scanner for continuous scanning.

Note: Tablets are sometimes set up internationally which will not be able to recognize a portable scanner, so it is important to go to Keyboard Settings first and set it to US Standard Keyboard to avoid trouble scanning.
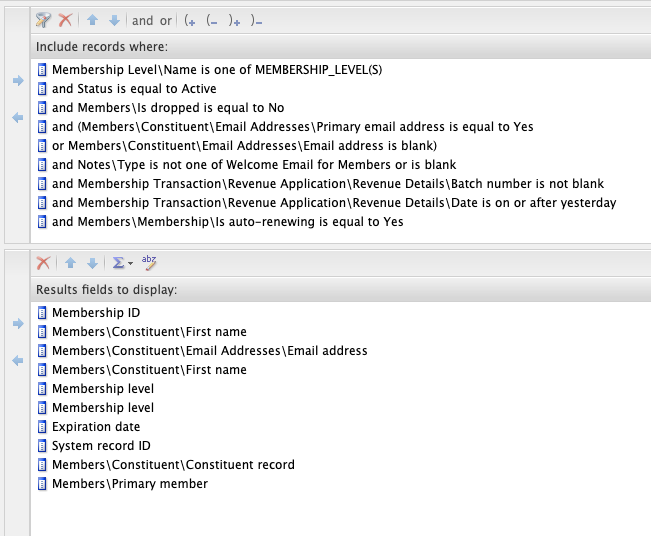
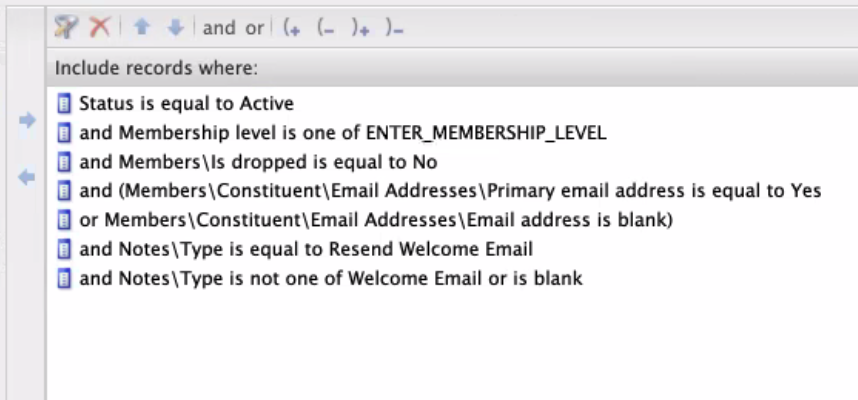
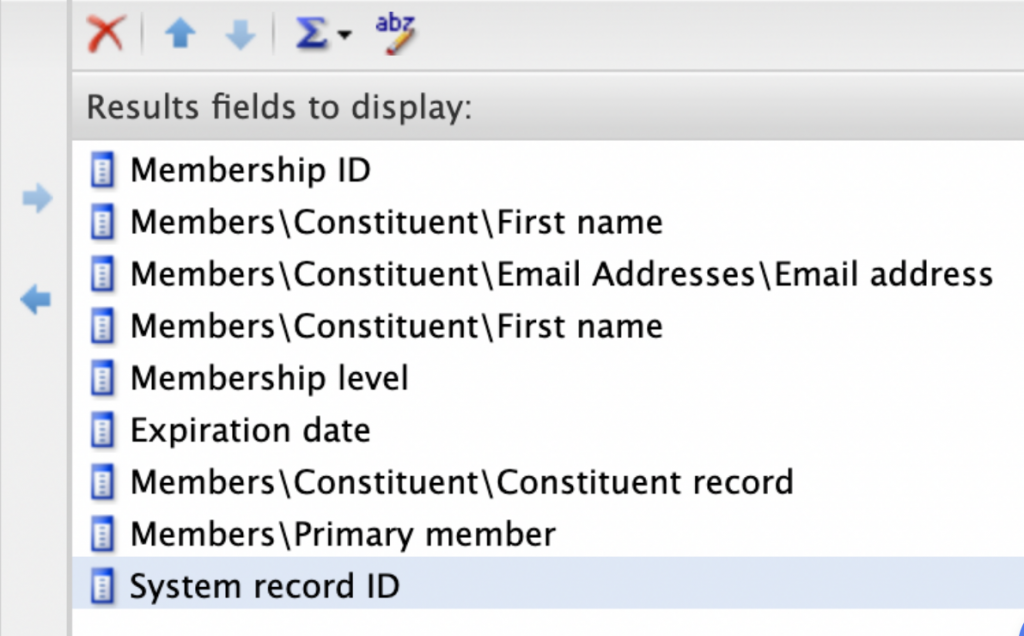
Below is a sample manual tagging query for Digital Membership Card that you can follow when creating one for your organization.
To effectively use Barcode Scanner, it must first get the correct role with Altru. You must set up the permission accurately to make the Barcode scanner track and validate any tickets. Remember that the data will not transmit to Altru if the barcode scanner role was established incorrectly. We strongly emphasize that setting up the correct permission on your account is necessary. It ensures a smooth transmission of information from the scanned tickets to Altru.
Step 1: Set up an account with Social Good Software. It is an account that usually no one is logging into. Through this account Social Good Software communicates with Altru and Altru talks back to the software. The account was very important and needs to be attached with Altru with the correct role and permission.
Step 2: As for the right permission, go to Blackbaud main website and find the article about system roles for Altru users as reference or click on this link:
What system roles should I assign to Altru users?
Search Bar

Result:


Step 3: Go to your Altru account and proceed to Administration. Assign the Ticket Seller role to the account attached to Social Good Software.


*Account name is for illustration only.
Step 4: Find the Ticket Seller under Edit and check its checkbox. Click on Save.

With the correct role and permission set up. You can now send information to Altru from the scanned tickets and attendance using Barcode Scanner. This makes sure that the generated output is accurate.
Before an eTicket email sends out to members/customers, it will first undergo an eTicket sending process in which meeting the requirement/s of every step is necessary. It is a repeating process but failing to satisfy each condition will disregard the eTicket email.
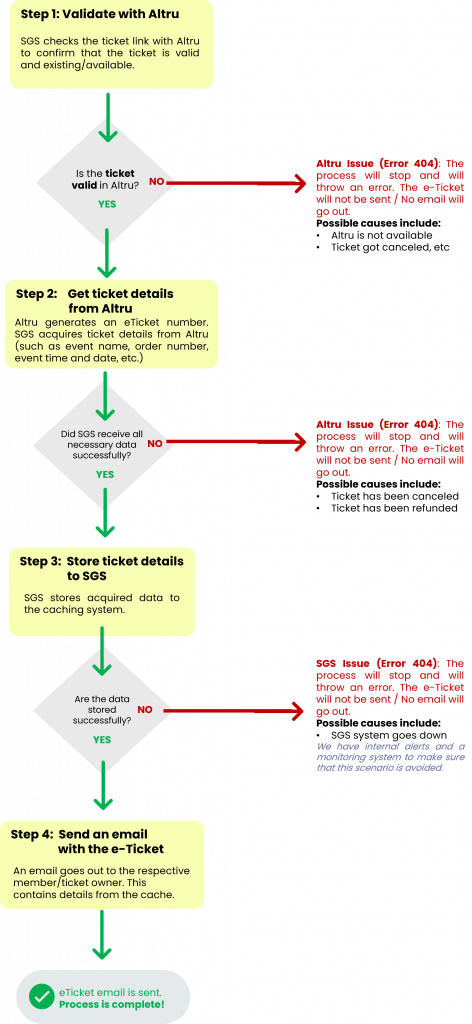
This illustration will give you an overview of what your eTickets emails undergo before the recipient receive them. It ensures that the recipient has the right e-ticket number and correct details before it goes out, or there is be no emails. Reach us out if you have concerns or questions through our support channel. We are always happy to help!