• Skip to primary navigation
  • Skip to main content

Social Good Software

Creating amazing guest experiences through innovative software solutions for the social good community

  • Features
    • Deduper
    • Calendar Builder
    • Email Designer
    • Barcodes Scanner
    • Online Template
    • Checkout Flows
    • Membership Portal
    • Data Bridge
  • Pricing
  • Contact
    • About
    • Contact
    • Careers
  • Login
  • Get Price

Help Center

How to bypass single email limit per email type

November 16, 2021 By Rick Hernandez

Email Designer of Social Good Software can bypass a single email limit per email type. You can enable this option if you need to email the same recipient multiple times. Keep reading to know how and when to use this option for your organization.

Step 1: Log in to your Social Good Software account.

Step 2: Go to email Designer and click an email. In this illustration, we will click on the email for Ticket Sold Today.

Step 3: Proceed to Settings to see the option called Email the same recipient more than once. You can enable this option if you need to send the same email more than once to the same receiver for various reasons.

bypass single email limit

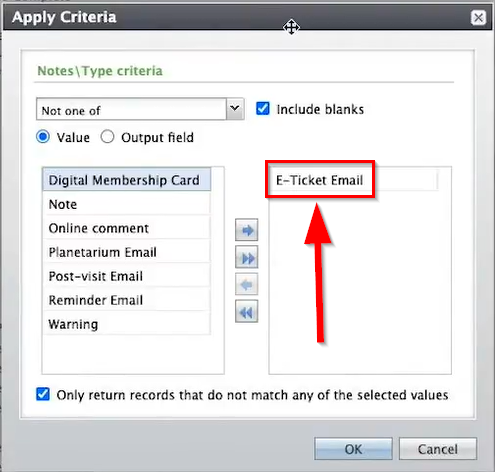
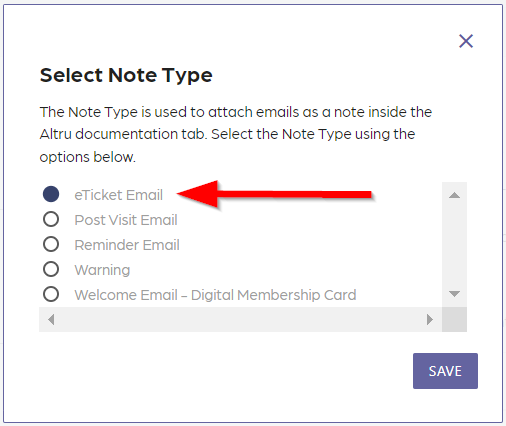
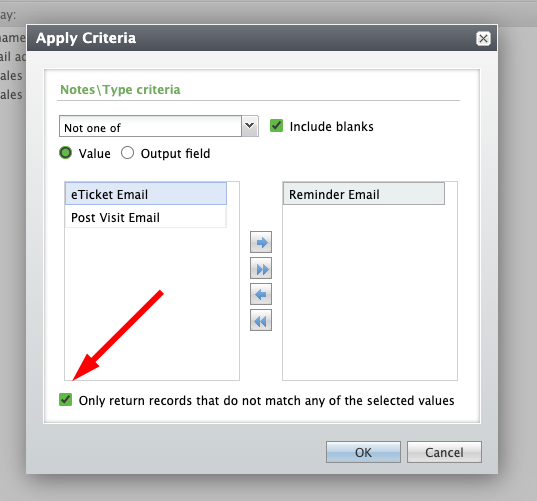
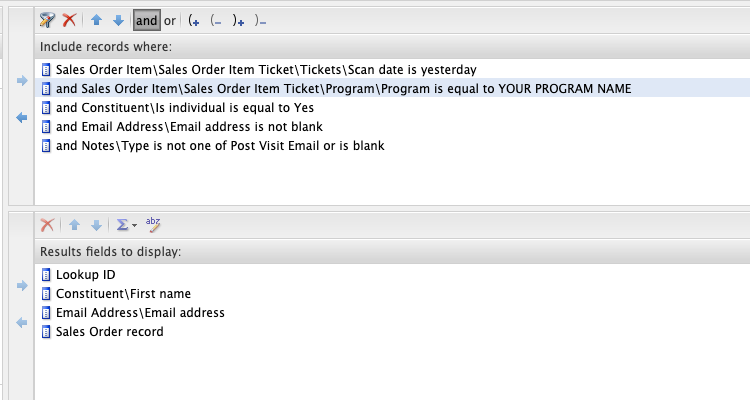
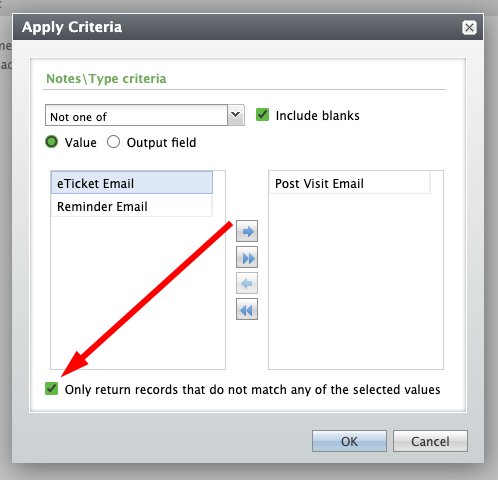
Warning: Do not turn on the option to bypass a single email limit per email type if your note type is not configured correctly with your query because your email will end up going to the same recipient multiple times per second.

Step 4: When you enable this option, a warning will pop out with a video on how to set up your query and note type inside of Email Designer. You must strictly follow the guide to avoid issues in the future.

bypass single email limit

We strongly emphasize that before you enable the option to email the same recipient more than once, you must be sure of what you are doing. You must configure your Note Type and set up your queries with Altru properly. Be very careful in using this option.

Filed Under: Email Designer, Emails, Help Center

How to send the email to the same recipient

November 14, 2021 By Rick Hernandez

Introduction

There are instances when people are requesting the organization to resend a particular email to them for different reasons. This guide on how to send the email to the same recipient is very helpful in this situation. Make sure to strictly follow the step below before you enable the function ‘sending the same email with the same recipient multiple times’ to avoid any issues. Also, ensure that the recipient acknowledges that he or she is receiving the same email.

Requirements:

  1. The Note type needs to be configured on the email.
  2. The Note Type in your query must be matched in your email.

Steps on how to send an email to the same recipient

1: Your query must have a Note type that exactly matches the note type in your email.

send the email to the same recipient

2: On the Email Designer side, the Note type under its Settings must exactly match the note type in your query.

send the email to the same recipient

3: On the query, make sure that the following are properly done:

  • Select the ‘Not one of’.
  • Check the checkbox for ‘include blanks’
  • Check the checkbox for ‘Only return records that do not match any of the selected values’.
send the email to the same recipient

Warning: Set up this function correctly before you enable the option to send an email multiple times, otherwise it will send the same email multiple times to the same person per second.

Filed Under: Designer, Email Designer, Help Center

How to create a GTM account with Google

November 9, 2021 By Rick Hernandez

If you create a Google Tag Manager account, you will be able to add and update website tags for conversion tracking, site analytics, re-marketing, and others. To start, you need to create a Google account and sign in. Follow the step-by-step guide below to understand better.

Steps on how to create Google Tag Manager Account

1: Proceed to this website: https://tagmanager.google.com 

2: Click on CREATE ACCOUNT.

how to create a Google Tag Manager account

3: Fill up the Add a New Account form based on the organization’s data. Once done, click Create.

how to create a Google Tag Manager account

4: Read the Google Tag Manager Terms of Service Agreement and click YES if it is acceptable.

how to create a Google Tag Manager account

5: Wait as it creates a Google Tag Manager Account and clicks OK.

how to create a Google Tag Manager account

6: Along with the Google Tag Manager account was the Google Tag ID. Note this ID and send it over to Social Good Software. 

how to create a Google Tag Manager account

7: Invite Social Good Software to work on your GTM account by going to Admin, then proceed to User Management.

how to create a Google Tag Manager account

8: Click on Add button, then Add users.

9: Add the email address of Rick – Founder of Social Good Software. Check on the administrator in case he needs to invite a team member. Also, check on the User checkbox. Once done, click Read to change permission.

10: Put a check on  Publish, Approve and Edit, then click Done. 

11: Proceed to Set all for Container permissions. Put a check on Publish, Approve and Edit. With this, Rick and the added team members can make changes on either Container Level or the specific Web Level we created.

12: Lastly, Click on Invite. Rick will be able to receive an invitation which will give him authority to invite his team members to help configure your GTM Account and set it up properly.

Conclusion

Hopefully, this process helps you set up a GTM account to give greater SEO Improvements to your business and website. If you have any questions, please reach us through our support channel. We are always happy to help!

Filed Under: Google Analytics, Help Center, Online Template

How to create an unsubscribed attribute with Altru

November 1, 2021 By Rick Hernandez

Introduction

To determine those individuals who unsubscribed, you just need to create an unsubscribed attribute with Altru. Do it once and it will be shared among all of your lists of members.

Steps on how to create unsubscribed attribute with Altru:

1: Open ALTRU and click ADMINISTRATION.

unsubscribed attribute with Altru

2: Proceed to ATTRIBUTE CATEGORIES under Data

unsubscribed attribute with Altru

3: Click ADD to create new attribute.

unsubscribed attribute with Altru

4: A dialog box will pop out. Input the following and click Save.
Name: Unsubscribed
Record type: Constituent
Attribute group: N/A
Data Type: Yes/No
Note: Make sure to click on the ‘Allow only one per record’ checkbox.

Once done with the steps above, you can now connect it all together with the Data Bridge which is very useful in attaching those unsubscribe attributes.

If you have more questions, please reach out to us through our support channel.

You can also check the tutorial on How to create an attribute for a segment with Altru.

Filed Under: Altru, Data Bridge, Help Center

How to create an attribute for a segment with Altru

November 1, 2021 By Rick Hernandez

Introduction

If you have lists of constituents in Altru, you also need to create an attribute for that segment. Every list must have an attribute assigned to it. Attributes are useful when you send an email and you only want those individuals who belong to a particular group to receive your message.

Things to consider when you name an attribute for a segment:

  1. Who those individuals are.
  2. What group they belong; and
  3. It must be readable and maintainable in the future.

Steps on how to create an attribute for a segment with Altru:

1: Open ALTRU and click ADMINISTRATION.

2: Proceed to ATTRIBUTE CATEGORIES under Data.

3: Click ADD to create a new attribute.

4: A dialog box will pop out where you need to supply the needed information. Click on Save.
Name: (best describe the list)
Record type: Constituent
Attribute group: None
Data Type: Yes/No
Note: Make sure to click on the ‘Allow only one per record’ checkbox.

create an attribute for a segment

Create an additional attribute by repeating the process from step three then provide the needed information.

Summary

Creating an attribute is needed if you have lists of individuals who belong to a particular group. It is helpful to your organization because you can use this list for your marketing campaign. Sending emails to your target group of people will be a lot easier and faster when you have your attribute.

If you have more questions, please reach out to us through our support channel.

You can also learn how to create an attribute for your email list. And, we also provide a guide on how to create an unsubscribe attribute.

Filed Under: Altru, Data Bridge, Help Center

How to create a SYNC Operations note type

November 1, 2021 By Rick Hernandez

Introduction

Learning how to create a sync operations note type in Altru is beneficial to your organization because it helps record the operations that happened in particular constituent information. It is useful as it gives the history of all the operations done on a particular record. 

Whenever the organization’s data sync, you will be able to determine what operation took place, updated, and moved over in a certain constituent record. With note type, you will be able to see all the operations that happened on a particular constituent record.

Steps to create a SYNC Operations note type

1: Open ALTRU and click ADMINISTRATION.

How to create a note type

2: Proceed to CODE TABLES under Data

create a sync operations note type

3: Click on FILTER then the DROP-DOWN MENU

create a sync operations note type

4: Select BIOGRAPHICAL and click APPLY

create a sync operations note type

5: It will show a list of biographical types that can be set up. Click on CONSTITUENT NOTE TYPE then ADD.

How to create a note type

6: A dialog box will pop out. Add a name to the description area for a new note type then click OK.

create a sync operations note type

Summary

You now have a newly created note type that you need to add to a particular constituent record. This will make sure that every time you perform a data sync, it will be easier to query and simpler to check the operations previously done. Note type is also useful for data restoration since it contains the original information for previous data syncs.

You can also check the tutorial on how to create a membership note type and how to create a custom note type with Altru.

If you still have questions or need clarifications, please reach us at support@socialgoodsoftware.com.

Filed Under: Altru, Data Bridge, Help Center

Reminder eTicket email Query for Altru

October 15, 2021 By Rick Hernandez

IMPORTANT: You must include a note type

Filed Under: Email Designer, eTicket Queries, Help Center

Post-visit email Query for Altru

October 15, 2021 By Rick Hernandez

Post Visit Query Example
IMPORTANT: You must include a note type

Filed Under: Email Designer, eTicket Queries, Help Center

Post-visit email template for Altru

October 13, 2021 By Rick Hernandez

Download Template

Social Good Software created a Post-visit Email template to serve as your basis for building your Post Visit Email. You can customize it and add additional details to fit your organization’s core values and style.

Watch this mini video which will walk you through the template, or follow this written guide.

1: Before you edit the Post Visit Email Template, make sure to copy it first through this link Post-visit email. Save it to your Google Drive or download and revise it in Microsoft word.

Save to Google Drive

Download to Microsoft Word

2: Edit the highlighted text with the organization’s information. 

  • You have the option to fully customize the title of the email and revise the content if necessary.
Post-visit email template
  • For the Footer, you have the alternative to include your organization’s address, phone number, email address, and other details, depending on your preference.

3: You can include an image with a size of 800 x 200 as recommended and upload it within the container.

Post-visit email template

4: Use Merge fields from the Altru query to add value to the email. Make sure that any merge fields you include are added in the query, if not, it will simply be a space.   

Post-visit email template

5: As for the survey section, you need to add your link to your survey form. Use tools like SurveyMonkey or Google Forms if you need to cause we are not responsible for doing the survey.

Post-visit email template

You now have a fully customized Post-visit Email that expresses your gratitude to your members and guests for stopping by. You also have the opportunity to gather feedback for the improvement of the services offered by your organization.

Filed Under: Email Designer, Email Templates, Help Center

Reminder email template for Altru

October 13, 2021 By Rick Hernandez

Download Template

Social Good Software created a Reminder Email template to help you draft your reminder email effectively and with a personal touch. You can fully customize it to help you build a connection with your members and guests but under your organization’s brand and style.

1: Copy and save the template in your google drive. You can also download it in Microsoft word before you do the editing.

Copy and Save in Google Drive

Save and Edit in Microsoft Word

2: The title of the email was already available, but you can still fully customize it.

Reminder email template

3: You also have the option to add an image to your reminder email by uploading it and placing it in this container. The recommended size is 800×200.

Reminder email template

4: You can include additional merge fields depending on your organization’s preference.

  • When you add a merge field into your email, you have to also include the merge field in your query.
  • Below are the merge fields that we added for your reference.
Reminder email template

5: Change the highlighted text with the organization’s information. You can also alter the body of the email to fit your organization’s style.

Reminder email template

6: You can also add the link for your website and include additional links if necessary.

7: Include the order summary using the merge field to enumerate all the needed information.

Reminder email template

8: Finally, you can include additional details in the footer. You can provide information about your organization and help distinguish it from others.

Once done, you will have a reminder email template as if made for a particular guest. With this, you will be ready to have a call with our onboarding specialist. She will help and teach you how to add all this information to the email designer.

If you have concerns or questions, please reach us through our support channel. We are always happy to help!

Filed Under: Email Designer, Email Templates, Help Center

  • « Go to Previous Page
  • Page 1
  • Interim pages omitted …
  • Page 6
  • Page 7
  • Page 8
  • Page 9
  • Page 10
  • Interim pages omitted …
  • Page 20
  • Go to Next Page »

Social Good Software | Altru software integrations | Deduper | Calendar Builder | Email Designer | Barcodes Reader | Checkout Flows | Membership Portal | Online Template | API Integrations