Introduction
A neat and well-maintained domain for your website brings tremendous professionalism to your organization in the Internet era. When you have separate sections in your domain, like members, clubs, support, and others, it is recommended to create a separate subdomain to easily navigate to that section. It is easier to navigate to members.domain.### than domain.###/sections/members. In this tutorial, regardless of what DNS provider you have, follow along to create a subdomain. (In our tutorial, we will be using Cloudflare.)
Add a subdomain
This tutorial will use Cloudflare, but if you use a different DNS provider, the process will be the same or near identical, with the exception being your setup of SSL or TLS protocols (certificates for security over networks).
1. Create a new CName record.
Inside of Cloudflare, go into “DNS” and add a new record. Inside fo the interface, there are options to change the type of record. Change this to “CNAME.” From here, name your subdomain.
2. Grab the target address.
Go into Social Good Software. For this example, since we are making a subdomain for memberships, we went into Development -> Membership Portal -> Settings to find the target link. Copy the link from after the “https://“ to the end. It should look something like this:
00000000-a000-000a-aaaa-000a000a.socialgoodsoftware.com
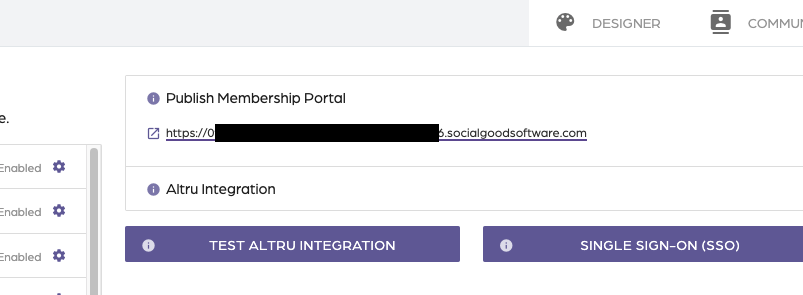
Paste this link into the DNS page under the Target box.
3. Configure SSL/TLS Settings.
Configure these settings to generate secure certificates for your website, enabling SGS to work properly with your website. If you have issues with this, since this is unique to each organization, you may need to configure this by contacting support with your DNS provider.
To view how to receive a SSL certificate from GoDaddy, click here or click on the link below.
https://socialgoodsoftware.com/how-to-get-the-ssl-certificate-from-godaddy
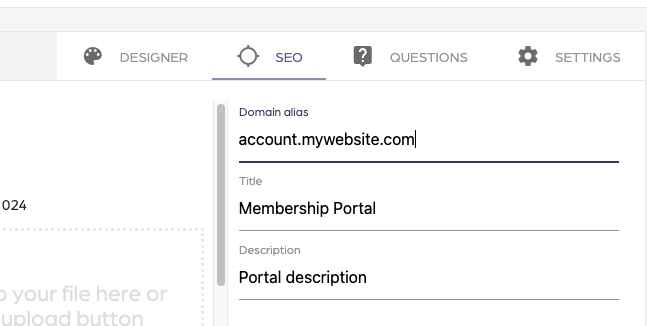
4. Configure SEO in SGS
Go back to the Social Good Software app, and go into Development -> Settings -> SEO. Under the Domain Alias on the top right of the screen, type in your subdomain name. In this case, we use “members.codewithintent.com” since we are making a members subdomain. Save settings before closing out of SGS.
Depending on your DNS provider, finishing your SEO configuration will either instantly make your subdomain live, or it may take longer—a few days maximum—to get everything situated and live.
Summary
Creating a subdomain in your DNS and linking it to SGS helps maintain a professional Internet presence. It gives your users a simple, clean experience working with your organization. Familiarize yourself with your DNS provider, and you can get subdomains up in no time. If you have any other questions, please feel free to contact us anytime.