How to set up your Team at Social Good Software
How to download your receipt
Before getting started
- You must be an administrator to view and download receipts
- You must have processed your payment online
How to download your receipt
Step 1: Go to the billing section
Click on the Settings tab on the left navigation.
Click on the Billing tab on the top right-hand navigation.

Find the transaction you want to view the receipt for.
Step 2: Download the receipt
Click on the PDF icon to download your receipt.

You will get a new tab opened with the receipt and you can now optionally print it or download it and save it to your device.
Tips on receipts
- You have access to the receipts as long as you have an active account
- If you want to view a receipt for a service we perform contact us
How to downgrade/upgrade your plan
Details on changing your plan
- You must be an administrator of the account
- You must have set up your billing details
How to downgrade/upgrade your plan
Step 1: Downgrade or upgrade your plan
Click on the Settings tab on the left navigation.
Click on the Billing tab on the top right-hand navigation.
Click on the Change Subscription button to open the dialog.

Next, select the changes you want to make. You can upgrade or downgrade and choose your billing options from monthly to yearly.

NOTE: You can upgrade and downgrade to any plan just keep in mind proration times and fees. You can contact us for more details regarding this.
Click on the Update Subscription button.
Your all set! You have successfully changed your plan.
Tips on when to upgrade and downgrade
- You want to try new features
- You want to go back to the basic plan
- You can upgrade your account at anytime
- You can downgrade your account at anytime
How to cancel your subscription
Details on canceling your account
- Not happy? Let us know
- You can cancel anytime
- Your subscription will remain active till the day you paid
- All billing will be stopped immediately
How to cancel the subscription
NOTE: You must be an administrator and have logged into your account before you can proceed with this guide.
Step 1: Cancel your subscription
Click on the Settings tab on the left navigation.
Click on the Billing tab on the top right-hand navigation.
Click on the Cancel Subscription button.

NOTE: If you don’t see this button more than likely you have not setup your account billing. No need to cancel a subscription that’s not active.
You will get a dialog asking you if you are sure you want to cancel your subscription.
NOTE: When your subscription gets canceled your account will be downgraded to a trial account with limited functionality. All your team member accounts will be disabled and removed from the system.
Click on the Cancel Subscription button

Step 2: Verify your account is canceled
After your account gets canceled you will get a confirmation dialog and your account will have limited functionality.

There you have it! Your subscription is now canceled. We welcome feedback so if you have any suggestions on how we can improve the service, please let us know.
Tips on canceling your subscription
- Your account gets downgraded to a trial account
- Your team members are disabled and removed
- You can always sign up again by selecting a plan
How to set up account billing
Who needs to set up account billing?
- You represent your organization
- You are the administrator of the account
- You have access to an organization card you can use
How to create your account?
NOTE: You must be an administrator and have logged into your account before you can proceed with this guide.
Step 1: Choose your billing plan
Click on the Settings tab on the left navigation.
Click on the Billing tab on the top right-hand navigation.
Select your preferred payment option from Monthly or Yearly.

Find the plan you want to sign up for Standard, Professional and Expert. You can learn more about the plans and their pricing here.
Click the Sign Up button.

Step 2: Enter your billing details
Verify you selected the correct plan and enter your Card Number, Expiration Date, and CVV values. Keep in mind that your credit card information will not interact with our servers and it’s encrypted and secured by Braintree payments.

NOTE: We support all major credit cards and PayPal. Optionally you can pay with a paper check but it takes an extra 48 hours to activate your account after payment is made. Please contact us for more details regarding paper checks.
Click on the Register button.

The payment processing could take up to 30 seconds to complete depending on your credit card provider. Leave the page open and wait for the payment to complete.
After the payment completes you see the following message.

Your all set to go! You can now start using the application with all the features unlocked for your selected plan.
Step 3: Download your receipt
Click on the PDF icon for your payment and a new window will appear with your receipt.

NOTE: Depending on the selected plan you will be able to see your receipt by monthly or yearly.
Tips on how to setup billing
- Have your payment method handy
- PayPal and all major cards are supported
- Can I pay with a paper check? Yes, contact us!
How to connect Altru credentials with the Social Good Software
Before you continue, please make sure you have completed the following action items.
- Created an Altru Account and verified it
- Created a Social Good Software Account and verified it
- You are the administrator for the Social Good Software Account
How to connect Altru credentials with the Social Good Software Application
Step 1: Correctly setup Altru Account.
This guide will show you how to add your Altru credentials into the Social Good Software application. Let’s get started.
NOTE: You need to firstly create your Social Good Software account and your Altru account which is needed for this application. If you have not done both of these steps, please follow each corresponding guide.
Once you have completed the action items above you will have your Altru Credentials for a new account you have created. Keep both the username and password handy you will need it in the next few steps.
Log in to the Social Good Software application using the following link.
https://app.socialgoodsoftware.com/login

Step 2: Get your Altru credentials into the system
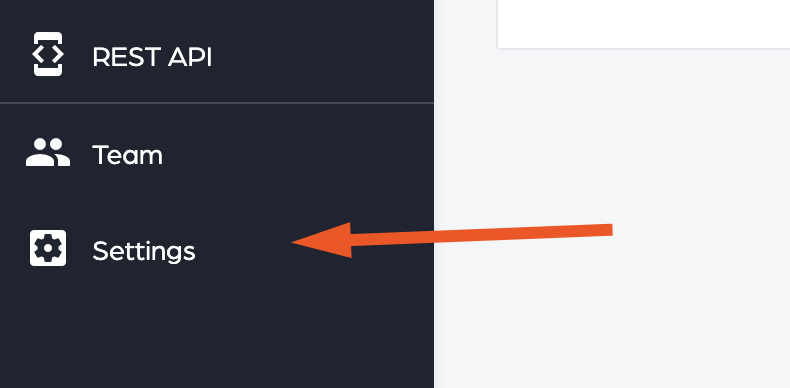
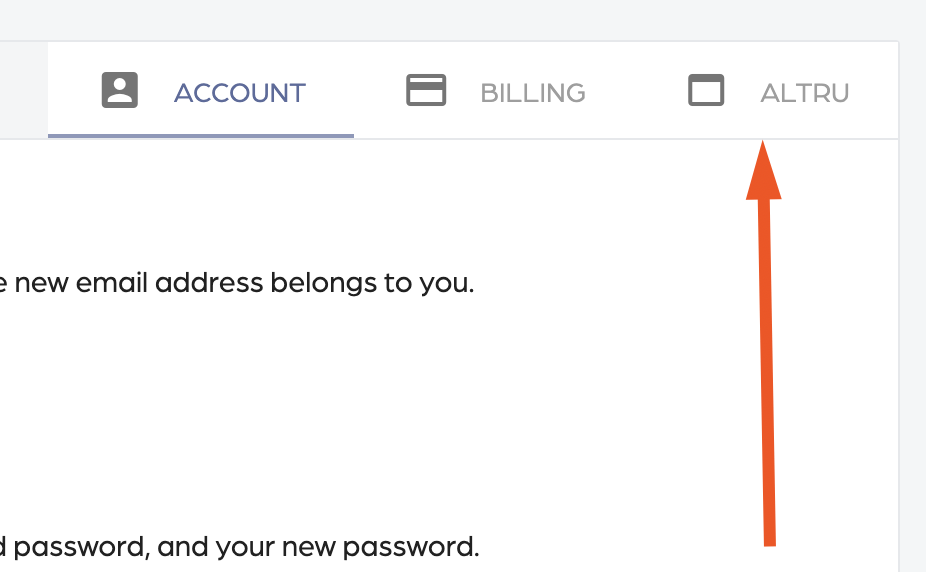
On the left-hand side of the screen click on the Settings option.
Click on the Altru tab on the top right-hand side of the screen.
You will now see the following fields
- Altru Domain
- Altru Root Directory
- Altru Username
- Altru Password
- Altru Database
- Altru Instance ID

Login into your Altru Instance. When you log in for the first time you are going to copy the URL on your browser. Make sure you don’t click on anything in Altru besides the URL link.
You see get a link similar to the one below.

Grab the link and paste it into your favorite text editor. We are going to break up the link into parts to be able to connect into Altru.
NOTE: Your link will look different than the one below. Keep your link private and DO NOT share it publicly.

- Altru Domain: https://altrurig02erp4.blackbaudhosting.com
- Altru Root Directory: 56931S_5837252a-5b1e-4bd3-89e7-0c418ebcb614
- Altru Username: support@socialgoodsoftware.com
- Altru Password: YOUR_STRONG_PASSWORD
- Altru Database: 4D5376CB-0A6A-4696-9F9C-69957459C116
- Altru Instance ID: 56931S
Step 3: Test your credentials to verify they are valid with Altru
Once you have all the details ready for your account click on the Save Credentials button to update your account with your new credentials.
Click on the Test Connection button to verify your credentials are valid.
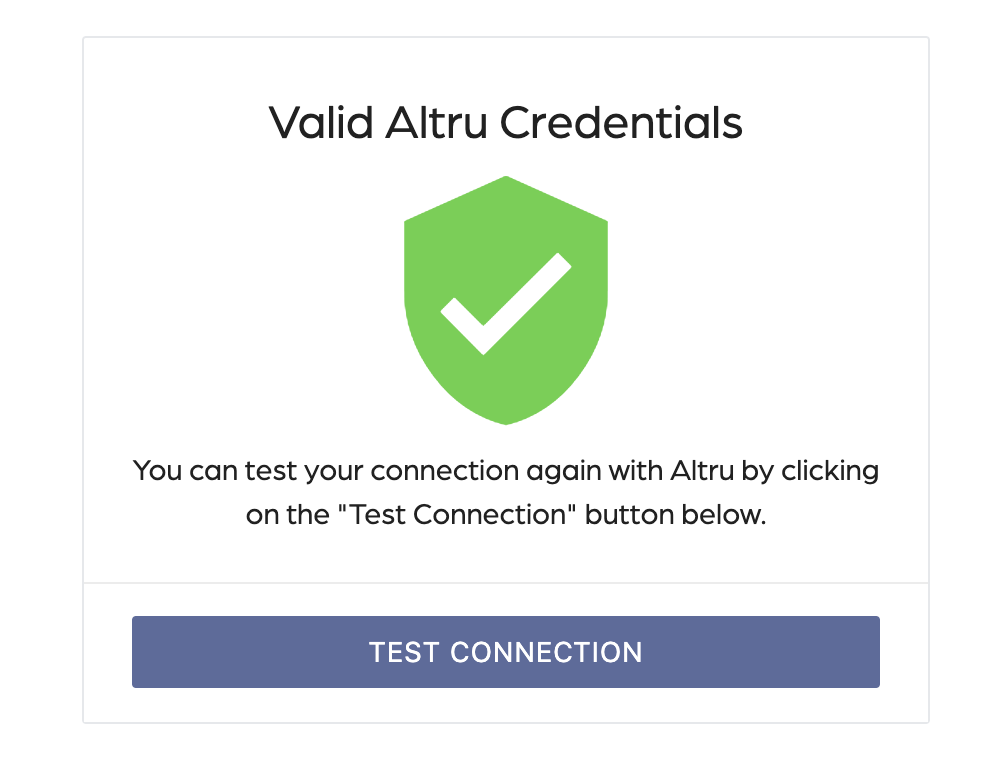
You will now see a Valid Altru Credentials message letting you know that your credentials are valid and you are now ready to start using the application with Altru.
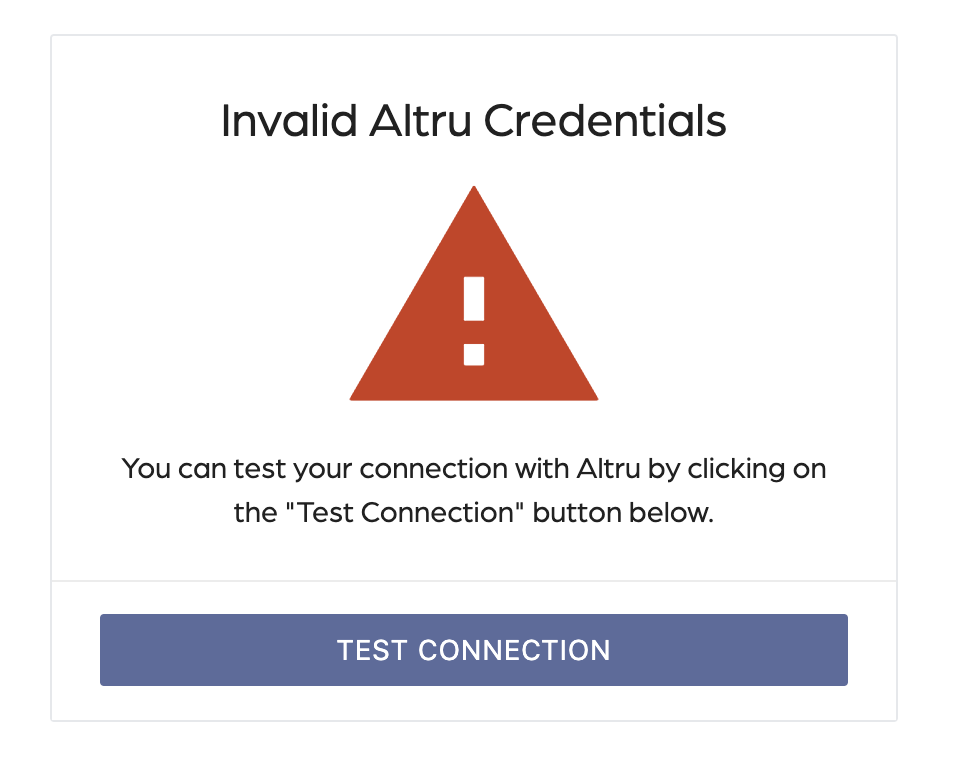
If you see the Invalid Altru Credentials message you will want to verify you have followed all the steps in this guide correctly. A typo or an invalid value could cause this message. Start back from the beginning and try again.
A common mistake is providing an account with an invalid role. Verify you created the account with the right information from step 1. If you are still facing problems make sure you reach out to support.
Tips for setting up your account credentials
- You don’t want to use your personal credential for this guide.
- We recommend a tool such as LastPass to manage your passwords.
- Make sure you have TextEdit, Notepad or your favorite text editor available.
How to create a new account with Altru
If you have been looking for a way to create an Altru Account for the Social Good Software application, then look no further. In this short tutorial, you will learn how to create an account with Altru. Just follow the steps listed below.
Why create a separate account?
- Logging purposes – You can monitor what the account does.
- Security purposes – You can keep a log of all actions inside of Altru.
- Mitigate risk for a potential breach
- Keep credentials independent of staff members
- Reset passwords without having to require a user’s personal email
How to create a new account with Altru
Before you start with this guide, please make sure you have an email NOT registered with Altru available for you to use.
Step 1: Create a new Account with Altru to use for Social Good Software
Login to your Altru account to start the process of creating a new user. If you don’t have access to create new user accounts contact your Altru administrator.
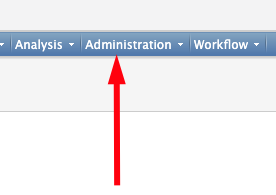
Go to the Administration tab on the top navigation of Altru.
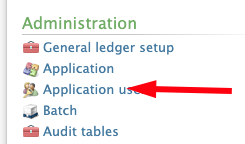
Proceed to Application users under the Administration section of Altru.
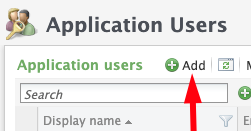
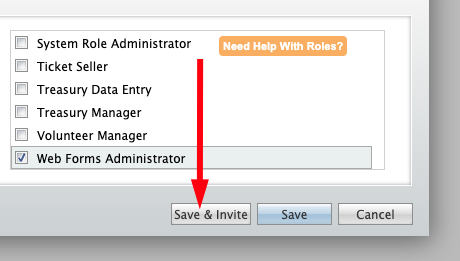
Under Application Users, click on the “Add” button and you will get a dialog to create a new user account.
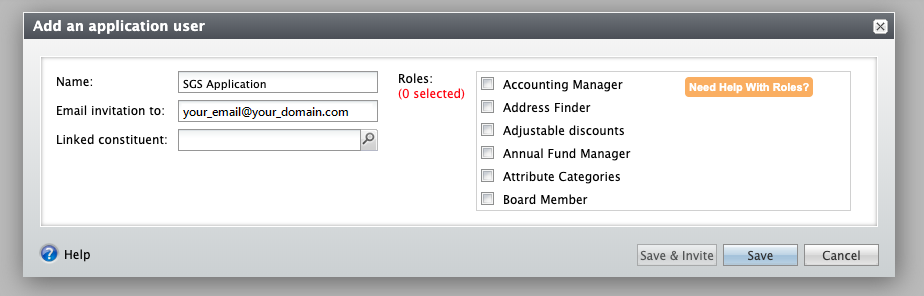
Give the account a name. We recommend SGS Application.
Type the email for the account.
NOTE: The email address needs to be an email address that you have access to. You can use a distribution list, a support email, or simply create a new email address.
Assign roles to the account
Step 2: Assign default Altru rules to the account
On the right-hand side, you will want to add the following roles to the user.
- Marketing Manager
- System role that runs queries on behalf of the organization (required for Deduper, Calendar Builder, Email Designer, Barcode Scanner, Membership Portal, and Data Bridge)
- Web Forms Administrator
- System role that generates links for the calendar (required for Calendar Builder)
- Ticket Seller
- System role that reads and writes access for tickets (required for Barcode Scanner and Digital eTickets)
- Development Data Entry
- Read and write access for constituents and memberships (required for Deduper, Membership Portal, Data Bridge, and Digital Membership Cards)
- Group Sales Coordinator
- Attach note for group sales (required for Email Designer)
NOTE: Altru as of this writing does not allow you to define your own custom roles. You will have to contact your Account Executive and pay a fee to have Blackbaud define and create a role for you.
Once you have given the account the right roles it’s time to click on the Send an Invite button.
Altru will send you an email to confirm the email address.
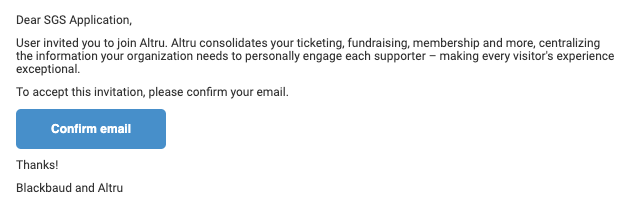
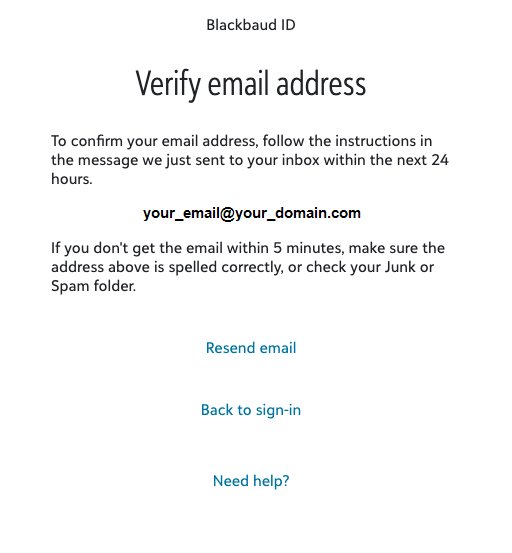
Before you confirm the email address you will need to make sure you have verified your account. To verify your account you must first create it. Create the account and verify you own the email address.
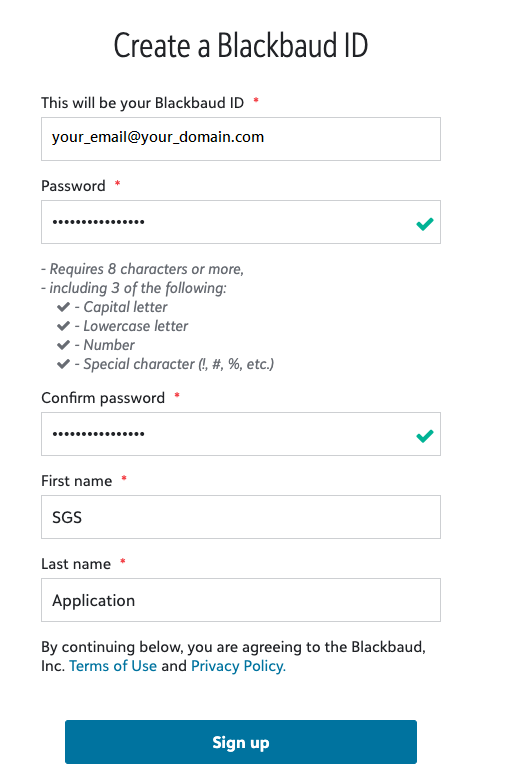
Next, verify you own the email address with a separate email from Altru.
Once verified and created you are now ready to use those credentials with the Social Good Software application.
Grab your username and password and go to Social Good Software Admin area to set up your account for the first time.
Tips on managing your new account
- Have an email not registered with Altru available before you start this guide.
- Altru requires you to change your password every six months. Make sure you comply with Altru and keep your passwords always up to date.
- WARNING: You typically don’t want to assign the System Administrator role to this account.
- Don’t share your newly created account with anyone besides the SGS application.
How to import Altru Events into Calendar for Mac
Learn how to import your custom Altru Calendar created by the Calendar Builder application into Calendar on Mac.
You must have created a Calendar before you can export the calendar into Calendar on Mac. If you have not created your calendar go ahead and create it first.
Make sure you are logged into your Mac with your calendar open. You can access the calendar application searching for calendar using the CMD + Space command.

On your file menu, you will find the option to add a new calendar subscription go ahead and click on it.

You will need the link to the URL for the calendar and the calendar name. Let’s first start with the URL for the calendar. Go and find your calendar inside the Calendar Builder and click on the Share tab.
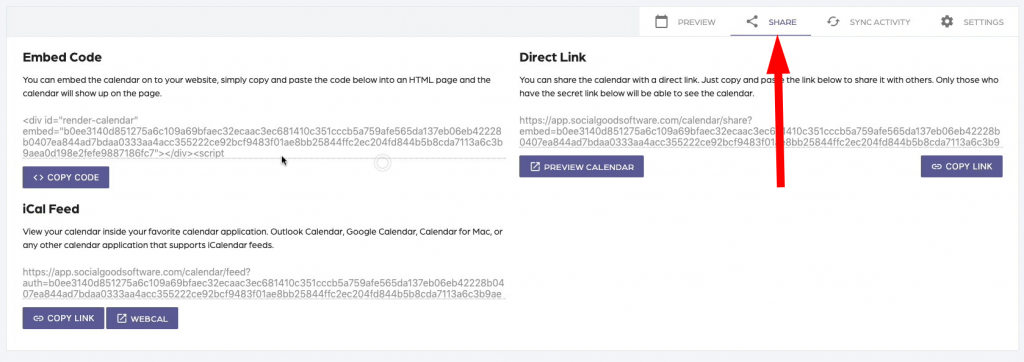
Then you are going to want to click on the “Copy Link” button to bring over the URL for the calendar by pasting into the “Calendar URL” field.

Once you click on the Subscribe button you will get a dialog to set up your Calendar by giving it a custom name.
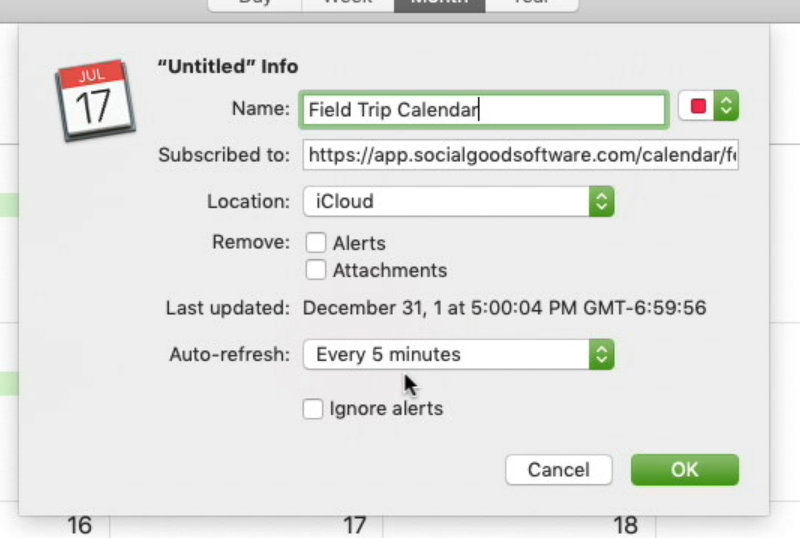
Next, make sure you uncheck alerts and attachments. Lastly, don’t forget to set the “Auto Refresh” to be every 5 minutes. This will make sure your calendar is always up to date with Altru.

Once you see your events in your calendar you are all set to go. Remember you can add as many calendars as you want into the Calendar application.
How to import Altru Events into Google Calendar
Learn how to import your custom Altru Calendar created by the Calendar Builder application into Google Calendar.
You must have created a Calendar before you can export the calendar into Google Calendar. If you have not created your calendar go ahead and create it first.
Make sure you are logged into your Google Account with your calendar open. You can access the calendar application by visiting this link.
On the left-hand side of the screen, you will see the “Other Calendars” tab go ahead and click on it. You will get a couple of options select the “From URL” option.

You will need the link to the URL for the calendar and the calendar name. Let’s first start with the URL for the calendar. Go and find your calendar inside the Calendar Builder and click on the Share tab.
Then you are going to want to click on the “Copy Link” button to bring over the URL for the calendar by pasting into the “From URL” field.

Once you click on the Add Calendar button your calendar events will get imported into your Google Calendar.
Please be patient as it can take up to 25 minutes for the events to show up. The time varies based on Google’s servers.

Once you see your events in Google Calendar they will be automatically synced from the Calendar Builder application.