Social Good Software Update 1.2.8v
Calendar Builder
- Fixed a minor bug with showing availability on sold-out events
- Fixed a minor bug with Go To Event in the past for date selection
- Removed timezone setting from Calendar share tab
- Added support for global timezone
- Added support to select if calendar links open in a new window or the same window
- Replaced input fields with fixed input for calendar selection on the data range type of calendar
- Added support for quantity attribute on calendar item availability. This adds better support to count for items sold through group sales
- Added support for caching system to cache links from the calendar if it’s a type of program from Altru
- Added new feature to allow you to clear the cache of all the links in the calendar
Email Designer
- Improved algorithm to detect when Altru is not online
- Fixed a minor bug when email templates are originally created they don’t have a value so we need to default out to “N/A”
- Added a new feature to support for merging fields. You can now use data from duplicate rows in your email
- Added better support for sending emails in parallel with each template
- Emails are now checked every minute instead of every five minutes
- Improve email sending functionality when Altru is offline or not able to respond back with data
- You now must setup a valid Ticket ID before you can enable the “eTicket generate” feature
- Fixed a bug when sending emails an “Email Sent” message is shown
Online Template & Checkout Flows
- Fixed a minor bug with checkout forms showing the “Please wait…” loading screen on form submissions.
Membership Portal
- Added a check to validate an email address is in the right format
- Fixed a bug when constituent profiles are being created when the setting was disabled
- Fixed a bug with barcodes not being able to get scanned in for the Membership Card (Web)
- Added support for CDN on the single sign-on service
- Fixed a bug when ticket downloads would hang for a long period of time
- Added support for line breaks on the PDF generated to do a line break for every four tickets.
- Improved reliability for the eTickets generated. We now only send out tickets if Altru returns back data.
- Fixed a bug with not being able to change the “Forgot Password” page
- Added support for user mapping based on the same id type
- Added feature to search by email address for a constituent preview in the SYNC tab
Data Bridge
- Fixed bug with zero value in google sheets not populating correctly
- Fixed bug with widget previews not working in production
- Added support for global timezone
- Fixed a bug with not being able to add team members to the Data Bridge application
- Added support to trim the label of long names for the preview
System Improvements
- Added the ability to set the timezone for the application. This setting is applicable for Calendars and the DataBridge and for any new timezones in the future
- Fixed a bug with team grid not displaying correctly if a team member has not created an account
- New security update
- Improved system logging for user actions
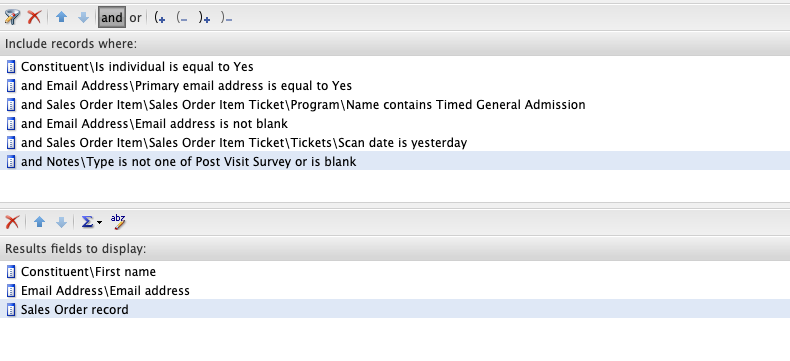
How to create a post-survey query with Altru
How to create a post-visit survey email with Altru
How to leave feedback on a prototype
Social Good Software Update 1.2.7v
Data Bridge
- Moved over to use the API for better fault tolerance during high network usage
- Added support for the last time updated timestamp on Google Sheets
Deduper
- Added support to remove false positive records on the results page
- Records with the same System Record Id are merged to one record-keeping only one data and discarding duplicate data
- Fixed a bug with columns not being sorted correctly in the overview page from ascending to descending order
- Added support to detach an email address
- You can detach email for each constituent manually
- Deduping service is now scheduled automatically after new settings are detected
- Added better support to go through each record when viewing a list of records
- Added support to remove items from the list after they have been merged together only local records
Calendar Builder
- Added new calendar type of “Date Selection”
- Fixed a bug when checking for jQuery version is not available only applicable to some sites using Drupal
- Fixed a bug for calendars that only have one event and want to jump to that event automatically
- Fixed a bug with calendars reverting to default when Altru is offline
Email Designer
- Added support to generate barcodes automatically for eTickets when emails are sent out
- Added support to attach eTickets as a PDF to the email before it’s sent out
- Fixed a bug when Altru returns no data for a variable inside an email. We now set the value to be empty.
- Fixed a bug when the title of a note type is longer than 50 characters it gets trimmed to be exactly 50 characters.
Barcodes Scanner
- Fixed iPad UI usability issues
- Added support to show invalid barcode scanned value for continues scanning option
- Fixed language to reflect new domain for invalid password
- Fixed a minor bug with colors not being set on the mobile app
- Released new versions of the app
- Fixed a bug with mobile clients not downloading new data when barcodes are validated
Online Template & Checkout Flows
- Released a CDN for all checkout flows using a static file system
Membership Portal
- Added support for primary address download
- Added new Integration Testing Tool – Helps narrow down issues with Access Control lists
How to remove an email address
Step 1) Login to Social Good Software
Altru disable acknowledgment emails
How to disable emails globally
Altru does not allow you to disable email confirmation on a webform by webform level. Instead, if you want to disable all acknowledgment emails you will have to disable them globally.
- Disable emails globally – Stops all transactional emails from Altru
For the sake of keeping the right verbiage correct “Web Form Level” is defined for your convenience below.
Web Form Level: Donation forms, program forms, combination forms, membership forms, event registration forms, and event package forms.
Disable emails at the web-form level
Unfortunately, Altru does not offer the option to disable emails at a web form level instead it defaults out to the “Default acknowledgment email”. Which sends out to all web forms that don’t have an email configured at the web-form level.
Disable emails globally
This will disable all transactional emails from being sent. This includes all web purchases or any other transactional email sent out through Altru. If you choose this option make sure you have created emails for all your outbound messages using the Email Designer Tool.
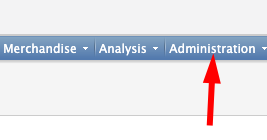
To disable all transactional emails login into Altru and click on the “Administration area”.

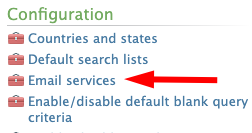
Go to the “Configuration” section and click on the “Email services” link.

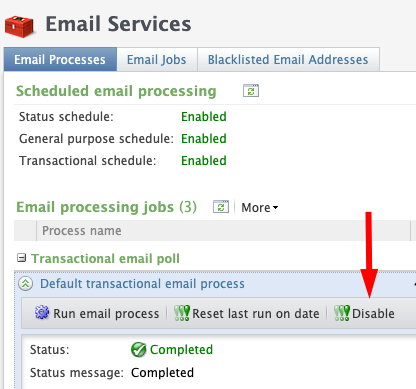
Wait for the page to load it could take 30-60 seconds to complete. In the “Transactional email poll” click on the chevron for the “Default transactional email process” and click on the “Disable” button.

