Social Good Software Update 1.2.5v
Deduper
- Added support to export duplicate data with excel or csv options
- Fixed a minor bug with Merging options not working without API level access
Email Designer
- Migrated to a more reliable scheduling system
- Fixed a bug with emails not being sent in some cases
- Fixed a bug with preview not working on encoded emails
- Added support of Query returns an empty value for money then we use ‘$0.00’ as a replacement
- Added support for Hour and Minute data type
- Added support for Integer data type
- Added support for the preview tab to only show the first 35 characters of the email
- Added support for sticky configuration in merging fields when Altru is offline
- Fixed a bug with new fields not getting pulled when re-adding an ODATA link on the creation of new email template
Calendar Builder
- Fixed a minor bug with calendars not updating cache on data downloads
Checkout Flows
- Added server-side caching for data (Improves response time)
Online Template
- Added server-side caching for data (Improves response time)
- Added back Dynamic Code Execution – Required for Donations in Cart page
Membership Portal
- Added faster response times for Single Sign on dialogs. ~30ms
Barcode Scanner
- Added better support for scanning tickets on a guest’s device. Watch Demo
System Improvements
- Rolled out a Content Delivery Network across all features in the product. Will increase reliability for traffic spikes.
How to Clean A Nonprofit Database – The Best Practices

Managing and organization is a vital part of nonprofit business operations and making critical decisions. The more secure and reliable it is, the better the outcomes will be both structurally and financially. With that in mind, it can be quite alarming to find out that nearly 90% of all spreadsheets had substantial errors in them. For big corporations, it will still be a blow, but they are likely to eat those losses easily. However, nonprofits may not be able to absorb those detrimental impacts nearly as well, which is why they should invest in the best data cleaning practices and prevent dirty data the best they can.
What Is Dirty Data?
Nonprofit dirty data is a database that contains errors. These errors can prevent business growth and potentially ruin a reputation if they are severe enough. Some examples include outdated addresses, duplicated entries, misspelling of names, and the list goes on. When these errors are present, it can drastically reduce efficiency. For instance, the Data Warehouse Institute estimated that United States businesses, both big and small, collectivity lose around $600 billion a year due to dirty data. With that being said, how does one fix this common issue?
How to Clean Your Nonprofit Database
Did you know that 57% of dirty data is brought to light because of customer reporting? This is a staggering number, as the business itself should catch these errors ahead of time. To prevent this from happening to you, it’s time to implement database cleaning practices within the business rhythm. There are several different data cleansing approaches you can take the ensure that the data you are running off of is as accurate as possible.
- Get Rid of All Extra Spaces – Spacing before, after, or in-between names or data can impact formulas, resulting in some information not being appropriately pulled.
- Get Rid of All Blank Cells – Blank cells can hinder performance and data pulling. It also makes the useful data look cluttered and distracting to look at.
- Remove Duplicates – This is a big one, and it frequently happens if more than one person is updating the database at the same time. Duplicate data not only clutters but can cause extra unnecessary mailings, which frustrate customers.
- Review Current Data Against New Data – If you have a list of customers who have been in the database for a year or more, it is more than likely that at least some of them have moved, gotten a new last name, or changed their phone number during that time. This can cause an inability to communicate with your customer base, resulting in poor performance. Since this is your lifeline, go through it all, customer by customer, and make sure the data is up to date.
- Set Error Rules – This can help you pinpoint any errors that occur much easier than trying to comb through the data line by line. All you have to do is go to your conditional formatting feature within your database, create a new formatting rule (example: highlight cells red if there is a space before the first letter, or if there is a blank cell).
- Spell Check – This is obvious, but is often overlooked. As data is being entered, go over the spelling and check it before submitting. For even more assurance, having someone else review it as well, or utilize a nonprofit data cleaning tool that hosts this much-needed feature for convenience.
- Delete all Formatting (Harmonize the Database) – It can be simple to copy and paste information into a database, but doing this regularly can set up inconsistent formatting, such as font sizes. A good tip is to get rid of all formatting within the database, and if you decide to copy and paste, use a “paste special” to transfer the information without the format tied to it.
Preventing Dirty Data in The Future
The biggest thing you can do for your nonprofit organization is to keep your database as clean and prime as possible. If the original data was dirty, first and foremost, clean it up. Then the next steps should be placed to keep it that way.
- Do regulatory entry updates, either weekly or bi-weekly.
- Get rid of people who are not engaging or have been inactive for a long duration.
- Only have one designated person allowed to enter data.
- Be consistent with how data is entered and streamline the process. For example, if you use “St.” instead of “street,” make sure to do that on every entry.
- Do a thorough clean at least once a month.
- Consider doing data backups for emergency recovery if need be, such as database crashes.
Conclusion
Nonprofits, and every other business for that matter, rely on clean databases to succeed. The future success lies within those details. However, mistakes happen, and more often than one may think. Even with these best practices and utilization of nonprofit data cleaning tools, errors still can arise from time to time. Though this is a reality, the key is to catch those errors before it becomes a catalyst for something more detrimental. So, make sure that database reviews and management are a top priority to ensure it is a valuable and reliable source to conduct business. The cleaner the database is, the higher the probability for nonprofit success and growth.
How to remove duplicate email from membership in Altru
How to set up ODATA links with Deduper
The Deduper application requires a data source to be able to dedupe data. You will need to first create ODATA Links before you can start using the application. If you have not already done so you can start with the following guide.
How to create Deduping Query with Altru
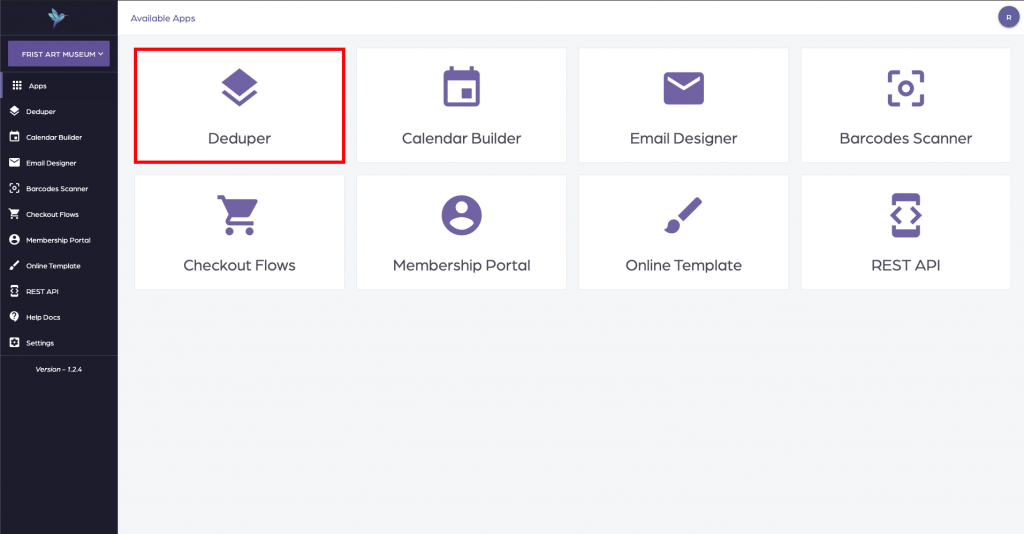
Step 1: Login into your Social Good Software account and click on the deduper application.
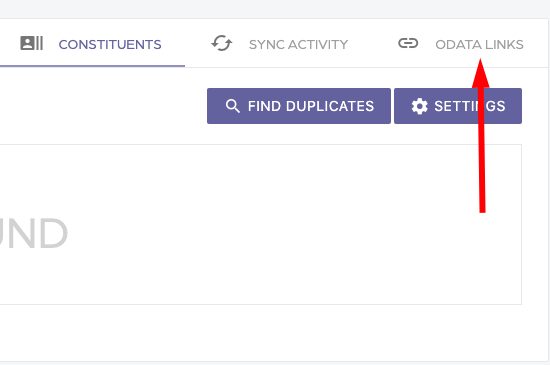
Once you have clicked on the deduper application click on the ODATA Links navigation item on the top right hand side menu.
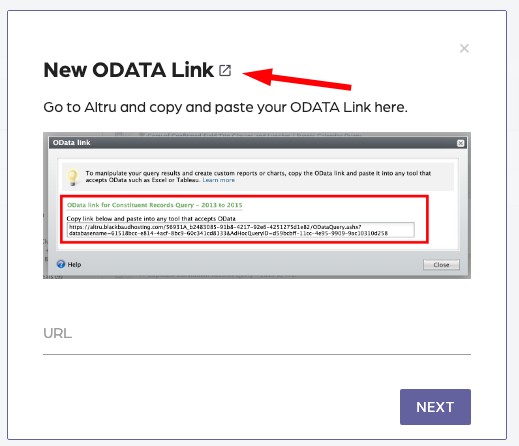
Then you will see the option to add an ODATA link. Click on the plus option to create a new link with Altru.
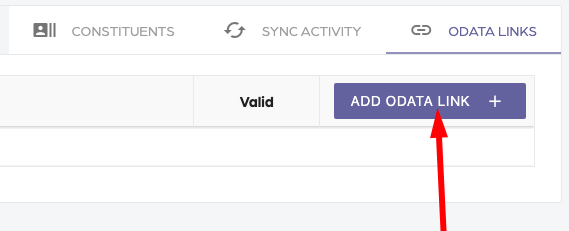
You will get a dialog asking you for an ODATA link since you already have created the ODATA links go ahead and add all the links to the Deduper application.
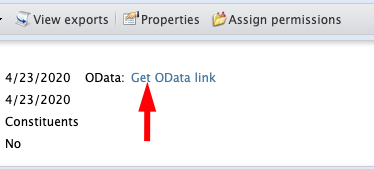
You can do this by logging into Altru and going to the information library and looking for the links you created. Once you find each of the links just click on the “Get OData link” and copy and paste the link into the Deduper application.
Each of the links will be validated with Altru just to make sure you don’t make any mistakes as you copy and paste the links into the input box. Please be patient as this can take up to 90 seconds to complete per link.
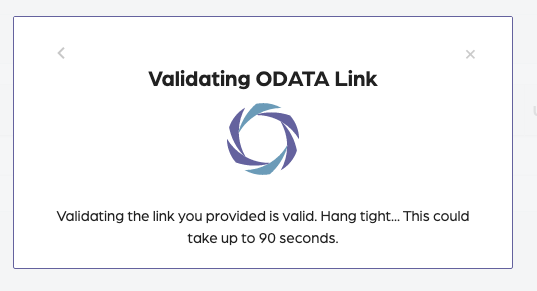
Once the validation is complete you will get a success message letting you know the link is valid.
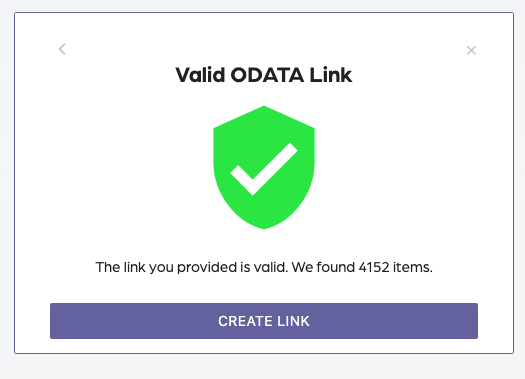
Repeat the same process for the rest of the ODATA links.
Step 2: Sync data from Altru
Once you have all your ODATA links setup the next step is to download data from Altru to dedupe it. Click on the Sync Activity tab and then click on the Request Data Button.
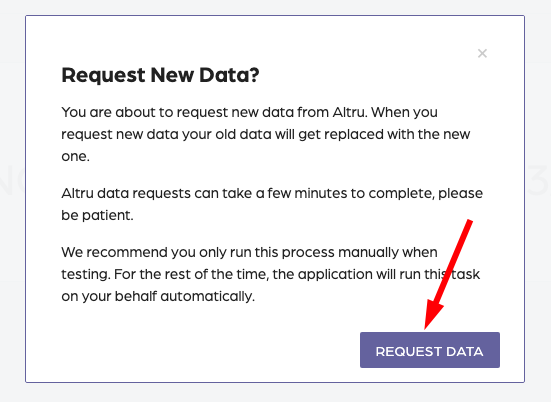
This process typically takes 5-10 minutes to sync data from Altru. Give it a few minutes to download the data before you move to the next step.
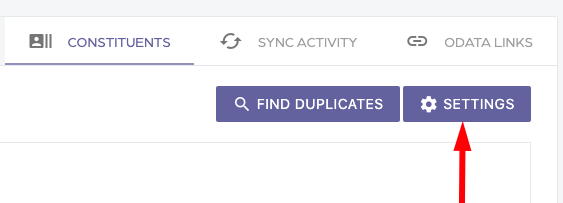
Step 3: Setup the Deduping key
Click on the Constituents tab to set up the deduping key.
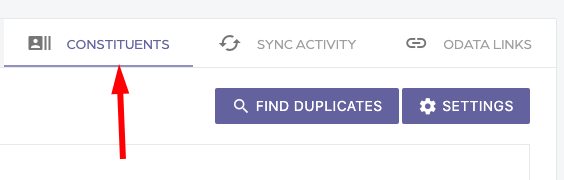
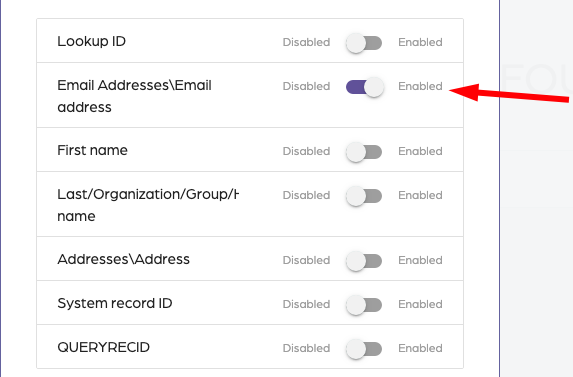
Then click on the settings button, this will bring up a dialog to set up the unique identifier key.
Deduping Key – The deduping key is used to find duplicate records in your data. In our example we will be using Email.
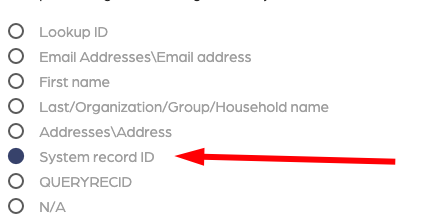
Once you have setup both the Deduping Key and the System Record Id you will be able to run the deduping process. Click on the save button to save your settings.

Step 4: Find duplicates in dataset
Click on the “Find Duplicates” button to find duplicates in your data.
This will bring up a dialog letting you know that this process could take up to 15 minutes.
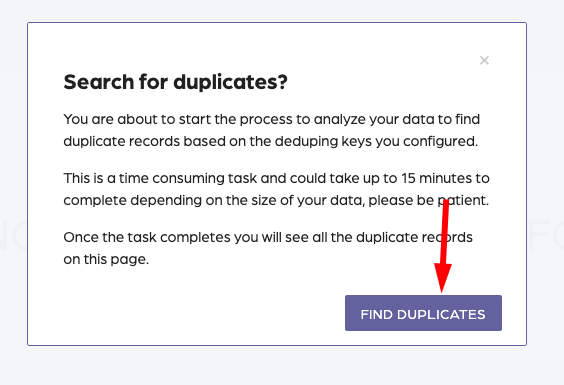
This will schedule a task to find duplicates in your data. Please be patient as this is a time consuming task.
How to create deduping Query with Altru
The Deduper application requires a data source to be able to dedupe data. Typically this is a query that outputs the data you want to dedupe. In this short guide, we will be walking you through the process of creating a simple query to find duplicates.
Remember this query can be any query you want to process for duplicates. For this example, we will be deduping our entire database, but you can choose which data to dedupe depending on how you set up your data source.
Step 1: Login into your Social Good Software account and click on the deduper application.
Once you have clicked on the deduper application click on the ODATA Links navigation item on the top right hand side menu.
Then you will see the option to add an ODATA link. Click on the plus option to create a new link with Altru.
You will get a dialog asking you for an ODATA link since we don’t yet have the link. We will click on the external icon to open the Altru information library directly.
Step 2: Create a De-duping query
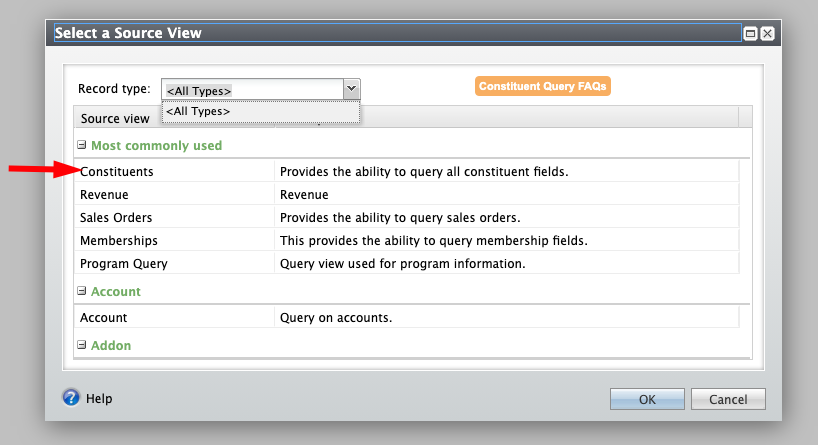
Clicking on the link will open a new tab with the information library in Altru. Click on the “Add an ad-hoc query” option on the top left-hand side navigation.

This will bring up the option to create a query. We are going to be creating a Constituent query to dedupe constituents.
Note: If you want to dedupe other data types select the right query type, for example, sales query.
Now it’s time to create the query based on our query restrictions.
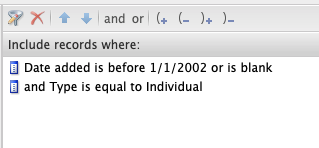
Let’s review each restriction one at a time.
The type is equal to individual – We only want to dedupe individual records at this time. If you want to dedupe other types such as organizations create a separate query and process those independently from this query.
Date added is before DATE or is blank – Altru has a restriction to only be able to output 15,000 rows at a time with ODATA links. Because of this restriction, we have to create multiple queries. You want to create a query that outputs less than 15,000 rows. In our example, it’s any record created before 1/1/2002. Keep in mind this could be different for your organization.
Let’s now setup the output display fields
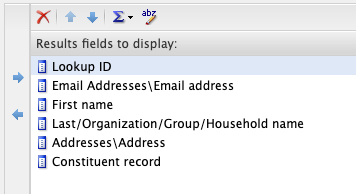
Let’s review each output field one at a time.
Lookup ID – Quick handy way to view if the record is a duplicate by just seeing the ID.
Email Address – Easily see if the email can provide a contextual action
First name – View the first name
Last name – View the last name
Address – View the address
Constituent record – We need this to be able to merge records together
WARNING: The Deduper only works with one type of column. Meaning you can’t have two columns that are the same such as Date changed, Lookup ID, etc.
Now click on the Preview Tab on the top navigation.

You will want to make sure the total result is less than 15,000 rows.
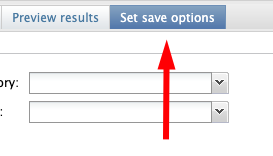
Don’t worry about not having all the records in this query, we will come back and create more queries for the rest of the records. Once you are happy with the output click on the “Set save options”
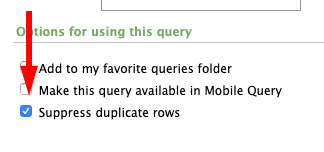
Make sure you check the “Suppress duplicate rows” checkbox. Don’t worry if you see multiple rows the Deduper application knows how to deal with duplicates.
Double check the output of the query is less than 15,000 rows.
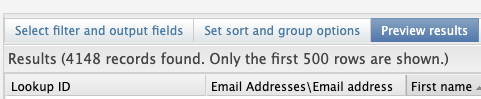
If you see more than 15,000 rows go back and adjust the date to output less than 15,000 rows.
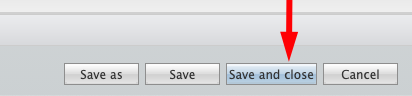
Once you have verified you have less than 15,000 rows then name and save your query.
Name: Duplicate Constituent Records Query (BOT – 2002)
Description: Query to output records created from the beginning of time to 01/01/2002
Step 3: Duplicate Query with revised dates
Once you have your query created, duplicate the query and adjust the dates for the next 15,000 rows in your database by clicking on the copy button.

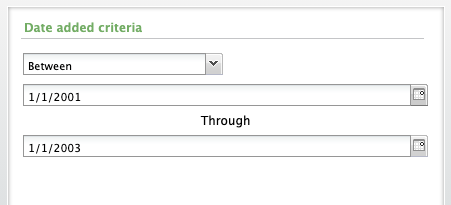
This will bring up a screen identical to the creation query screen. You will have to change the date range selection and rename the query to reflect the new dates. Select the date restriction and use the Between operator to select two date ranges.
You might be able to select more years depending on the output. For example, if your output is only a few hundred rows you can select a wider range of dates. If you are getting too many rows, you might have to restrict the date range between months and years.
Click on the “Set save options” and save your query by changing the name
Name: Duplicate Constituent Records Query (2002 – 2003)
Description: Query to output records created from 01/01/2002 to 01/01/2003
At this point, you will want to repeat the process in step three until you have done your entire database. This will equal a group of queries. Here is how the process works.

You will end up with a group of queries. You now have the ODATA queries required for the Deduper application. You can now at this point follow the guide on “How to set up ODATA links with Deduper”.
How to setup a list view for calendar on a mobile device
This short tutorial and video will guide you how to set up a list view for calendar on a mobile device.
Why Need a List View for Calendar on a Mobile Device:
A detailed view of calendar on mobile device looks either overcrowded or it has so many blank areas. Hence is becomes very difficult to use on a mobile device. In order to avoid this, a customized list view for calendar on a mobile device is very useful.
Requirements:
A calendar already built by using Social Good Software.
Steps:
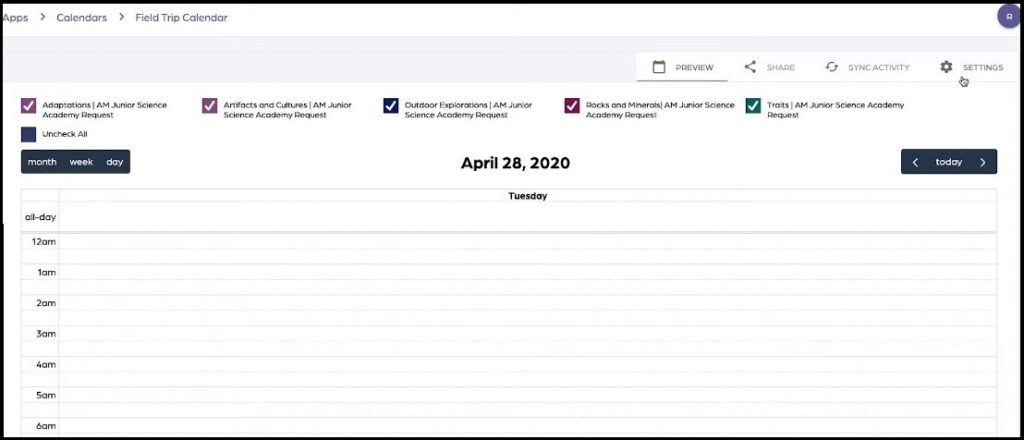
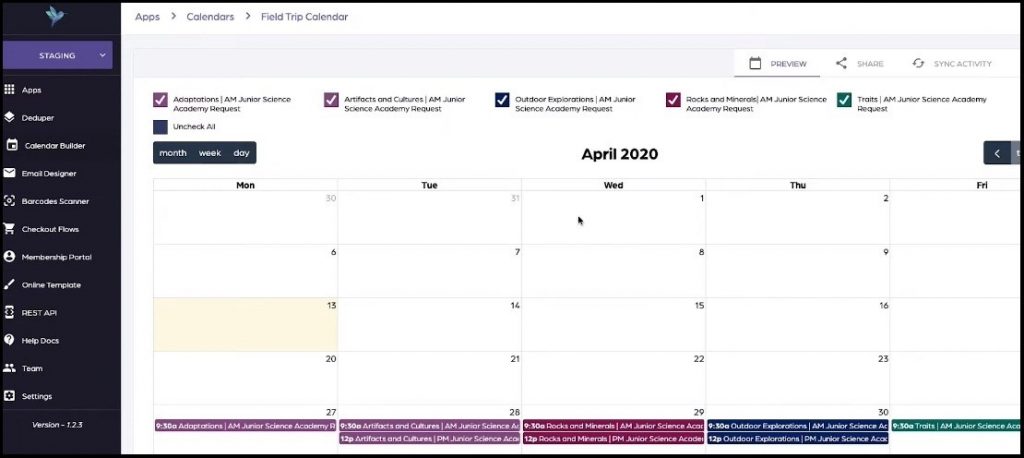
1. Click “Calendar Builder” tab on Social Good App. Now click a calendar from available calendars to open the calendar for which you want to set up list view on a mobile device.

2. Click “SETTINGS” on top right of the interface. This will open settings page with many preferences to customize your calendar.
3. Now look for “Mobile Calendar View” preferences. You can select any of the preferences i.e. “Monthly”, “Weekly”, “Daily”, or “List”.
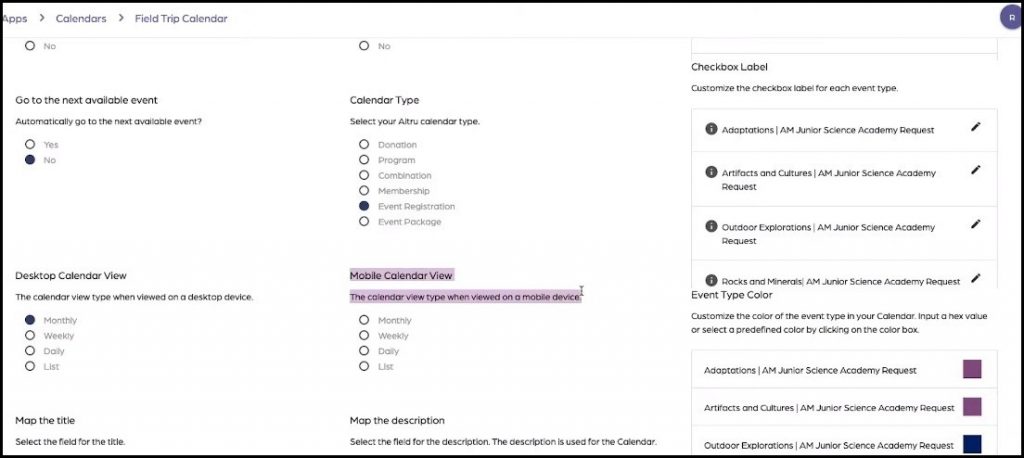
4. Select “List” from “Mobile Calendar View” and press “SAVE SETTINGS” button on bottom right of the screen. Now click “PREVIEW” from top right of the screen to preview list view for calendar on a mobile device.
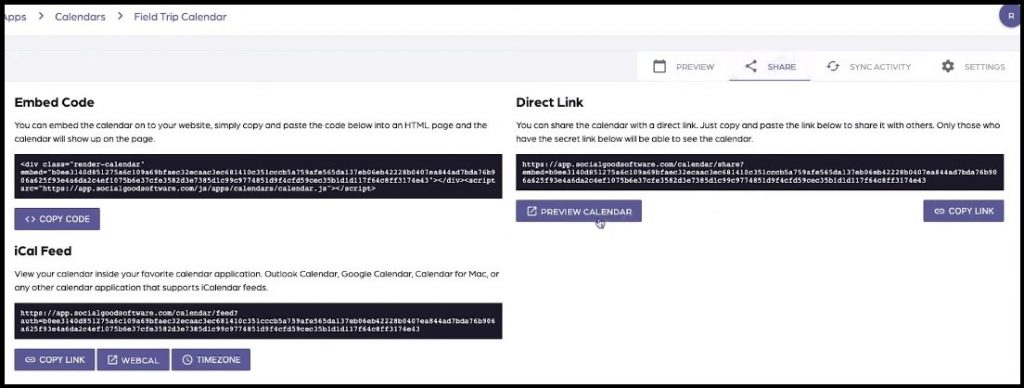
5. Next click “SHARE” from top right of the screen and then click “PREVIEW CALENDAR” below “Direct Link” to preview the calendar on a different tab.

6. Now press “SHARE” and then “PREVIEW” to preview the calendar on a mobile device. Now you can preview the calendar on a screen similar to that of a mobile device.

7. You can change the view type such as daily, weekly, or monthly any time by going back to settings just as described in step 3. Now open the mobile view again as described in step 4 and 5 and refresh the view by clicking “…….”.
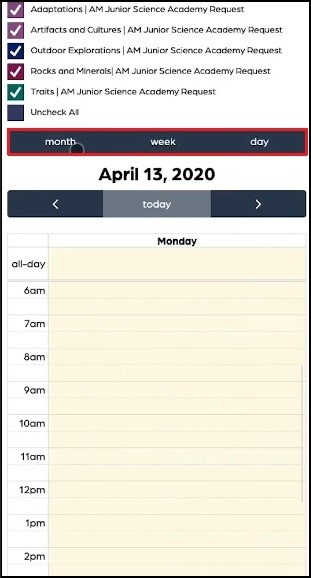
8. As you can observe, the “daily”, “weekly” or “monthly” views on a mobile device are not as user-friendly as list view. You can also directly toggle between “daily”, “weekly”, or “monthly” view by clicking “day”, “week”, or “month” from mobile view of your calendar.
Protected: Online Template – Wonders of Wildlife – Version 3
Protected: Online Template – Wonders of Wildlife – Version 2
How to add custom CSS and JavaScript to Calendar
This short tutorial and/or video will guide you how to add custom CSS and JavaScript to calendar.
Why Need to Add Custom CSS and JavaScript to Calendar:
Adding custom CSS and JavaScript enables you to improve the functionality of your calendar to meet your organization’s special requirements and preferences.
Requirements:
An already created calendar using Social Good Software
An already written CSS and Javascript you want to add to your calendar
Note: You can also “Reach out to us” if you need help writing these code.
Steps:
1. Click “Calendar Builder” tab on Social Good App. Now click a calendar from available calendars to open the calendar to which you want to add custom CSS and JavaScript.
2. Click “SETTINGS” on top right of the interface. This will open settings page with many preferences to customize your calendar.
3. Scroll down the settings page and look for blue colored “CSS” and “JavaScript” tabs on the left side of the settings page.
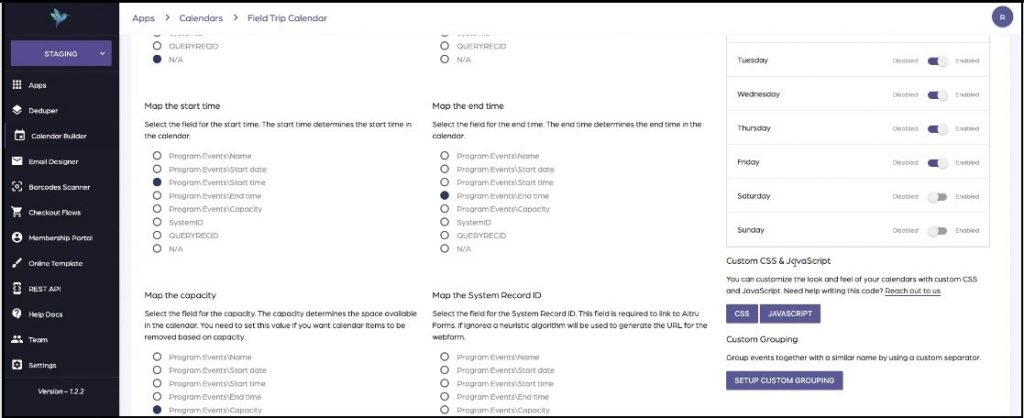
4. Now click “CSS” tab, copy paste the CSS code in “Custom CSS Code” box and press “Save”.
5. Similarly click “JavaScript” tab, copy paste the JavaScript in “Custom JavaScript Code” box and press “Save”.
6. Now click “SAVE SETTINGS” at the bottom left of the settings page and scroll up the page.
7. Next click “Preview” tab on the top right of the page to preview the added functionality of CSS and JavaScript code.
8. Click “Share” tab on the top right of the page and then click “Preview Calendar” and go down to mobile device by shrinking your window down or by using your mobile device to preview the calendar on a mobile device.
Note: Anytime you want to remove/edit the CSS and JavaScript from your calendar go to “CSS” and “JavaScript” tabs and remove/edit the code.
CSS
.render-calendar .container-wrapper {
    max-width: 80%;
    float: left;
}

.render-calendar .checkbox-wrapper {
    width: 19%;
    overflow: scroll;
    padding-left: 1%;
}

@media (max-width: 650px) {
    .render-calendar .container-wrapper {
        max-width: 100%;
    }

    .render-calendar .checkbox-wrapper {
        width: 100%;
        padding-left: 0%;
    }

    .render-calendar .checkbox-container {
        width: 100%;
        max-width: 100%;
    }
}
JavaScript
var checkboxes = $(container).find('.checkbox-wrapper').detach();
$(container).append(checkboxes);
var height = $(container).find('.container-wrapper').height();
$(container).height(height);
$(container).find('.checkbox-wrapper').height(height);