Help Center
Membership Portal Merging Options
How to enable email automation
If you are done with your emails and are now ready to send out all your outbound messages, the email automation of Email Designer is very helpful. All you have to do is to enable the automation function for it to send messages on your behalf. Make sure you follow the steps below for the best result.
Email automation process:
1: Log in to your Social Good Software account.

2: Click on the Email Designer on the left side of the navigation.

3: Find the email template where you want to enable the email automation function. In this example, we will be using Tickets Sold Today.

4: Click on the “Settings” option on the upper right side of the window.

5: In the settings section, you will see the option “Start sending emails?”. Enable this function and click on the “Save Settings” button.

6: You can go to Preview to see all the emails you are currently sending and the Activity tab for the emails already sent out.

Summary
Before you turn on the email automation function, make sure that you troubleshoot it first. Double check your email and edit it if necessary. Once the automation function is enabled, the Social Good Software will monitor the query you built and send out emails every 5 minutes on your behalf.
Please reach us through our support channel if you have concerns or questions. We are always happy to help!
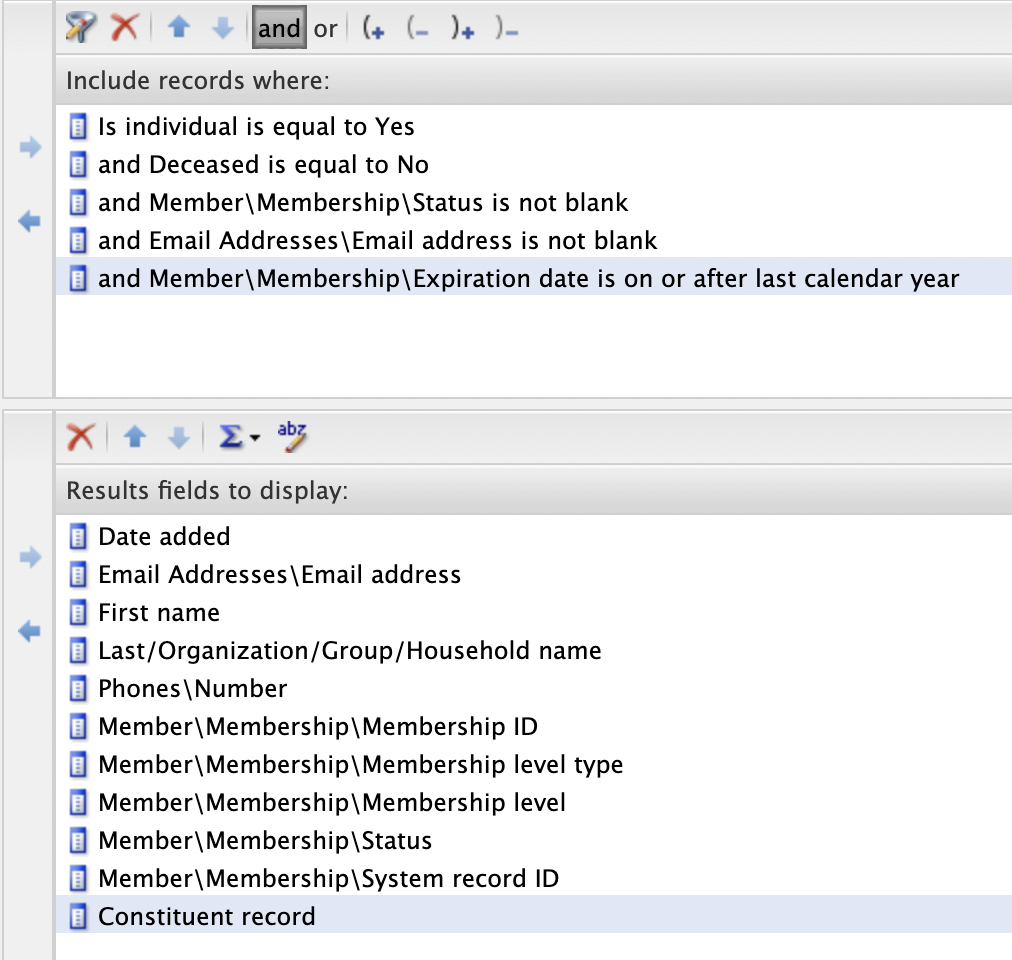
How to create an attribute with Altru for a mailing list
Create an attribute with Altru for a mailing list to add greater dimension to your constituents. With this attribute, you can tag someone with specific mailing lists. You can also include and exclude individuals using this attribute. This is useful when sorting email lists out especially with events or tiered membership level perks.
Creating an attribute with Altru for a mailing list
1: Go to your Altru account.
2: Proceed to Administration.

3: Move on attribute categories.

4: Click on Add.

5: A dialog box will pop out where you need to supply the needed details. When you create a new name for an attribute, keep in mind that it should be easy to understand and correspond to the list you are creating it for. Once done, click Save.
Name: Must after the list you are creating for
Record type: Constituent (make this attribute attach to all constituents)
Data type: Yes/No
✅Allow only one per record

Note: Make sure to check the box that allows only one per record to work this attribute correctly. This will override whenever someone opts in or out of the specific attribute.
If you want to create another attribute, just click on the Add button or repeat the process above.
Summary
Knowing how to create an attribute with Altru for a mailing list is helpful in organizing and sorting mailing lists so you can create more targeted emails for a more targeted audience. We also recommend that you add all the attributes that you can use throughout your list for proper segmentation.
If something is unclear in this article or if you have other questions, please contact us anytime!
eTicket email Query for Altru
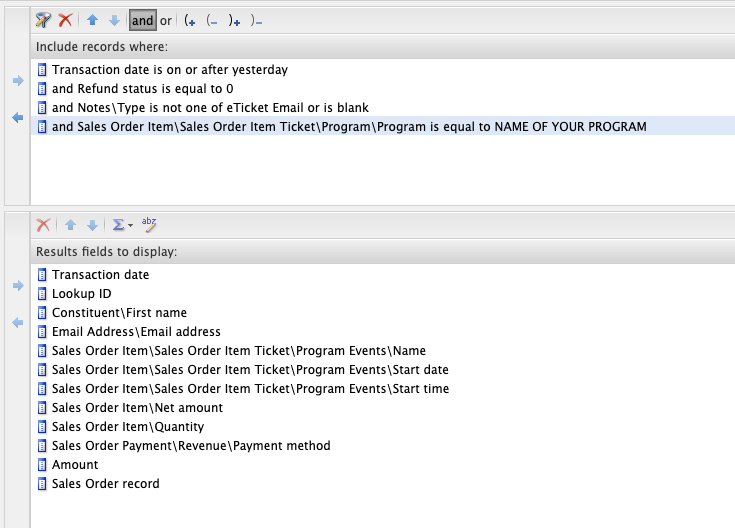
Membership Portal Query
Use this query to pull in all your members into the Membership Portal.
Note: if the query is pulling in more than 15,000 rows, you will need to shrink the query size by the date created.
Online Template: Best ways to modify the webforms
February 24, 2022
Merging Records for Digital Membership Cards
Duplicate data cannot be avoided but it is also necessary to maintain a clean list for your marketing campaign. A clean record can only be achieved if you remove, update and do merging of records.
Altru looks up to constituents based on the primary information like first name, last name, and email address. If there are multiple records in the system, it will be hard to identify which data to display on the Membership Card. In this article, we will show you how to deal with duplicate records and the process of merging of data.
Duplicate Records
- Assuming that you have two records with different first names which resulted in duplicate data. When you have these duplicates and you need to email this member for the first time then you have to pick one of the two records without deduping your data.
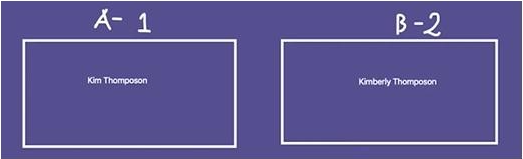
- In this example, we will pick the record A-1 and send an email that contains a link called A-1. If the member clicks on the email, she will get the membership card referencing the record A-1.
Merging of Data
- if you decided to keep Kimberly Thompson and merge the two records then get rid of all the duplicates.
- In this example, Kim will be added as an alias under record B-2. No need to bring over Thompson because it already existed. In the case of the System ID – they can only have one.
- This scenario shows that if you merge over record A-1 into record B-2, record A-1 will be deleted. The record ID that you are merging into will also be kept, which is the system ID of B-2. If this data was already merged and the member clicks again the link referencing record A-1 then she will get an error 404 because A-1 doesn’t exist anymore.
- Once the merge of records happened, the Membership Record in Altru which was originally attached to record A-1 was now attached to record B-2.
- Kimberly must manually tag to let her know that there are changes made with her record in the Altru system.
- Once Kimberly was manually tagged, the query will pick it up and take it over to the email which now contains the link for record B-2. When Kimberly clicks on the link, she will receive a Membership Card referencing record B-2.
- Take note that it is necessary to manually tag the member to re-communicate.
How to do manual tagging of emails for resends in Altru for digital membership cards
Manual Tagging comes in handy when guests who already received an email request to receive the same email again. Losing access to email because of accidentally deleting it or losing access to the email address is possible, so knowing how to do manual tagging is a must to help your customers with this request.
Keep on reading to learn more about manual tagging. Social Good Software gives you an illustration of how to resend an email to the same member below.
1:Open your Altru account and find the membership record of the guest who requested to resend an email.

2: Scroll down to Documentation and delete if there is a welcome email attached before you click the Add button and select Note.

3: A dialog box will pop out. Click on the drop-down menu of Type and select Resend Welcome Email. Click on Save.

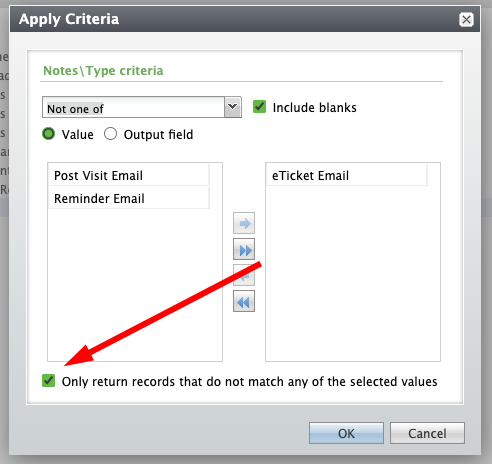
Once you manually tag a guest, Altru will pick it up on the query. It will look at sales orders that do not have a Note Type and automatically sends the email to the guest.
You don’t need to switch from Altru to Social Good Software to resend the email. Simply tag the guest in Altru, and delete the attached previous welcome email. If you add the Note Type, Altru will resend the email to the guest automatically.
How to preview pages with the Online Template
Online Template is an easy-to-use tool to customize your web forms. In this documentation, we will discuss how to use the tool and its available components. Also discussed is how to preview pages with the Online Template without swapping out those web forms in Altru and before these forms go live.
With this tool, you will be able to preview your web forms and anything that is being sold online. Remember that this is just a preview. Not everything works as it would be in the production because there are limitations.
We will not be able to show you exactly everything from checkout to cart and confirmation to the credit card but we can show you the first part which is the checkout side. When you are already in this step, the remaining work is for you to preview the pages and make sure that everything looks good and meets your expectations before we move forward.
Online Template Designer
It was already a pre-configured tool but if you want to make changes, you can use the little icons below.
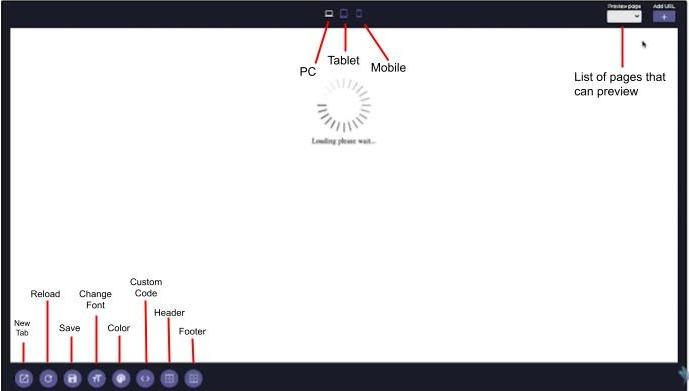
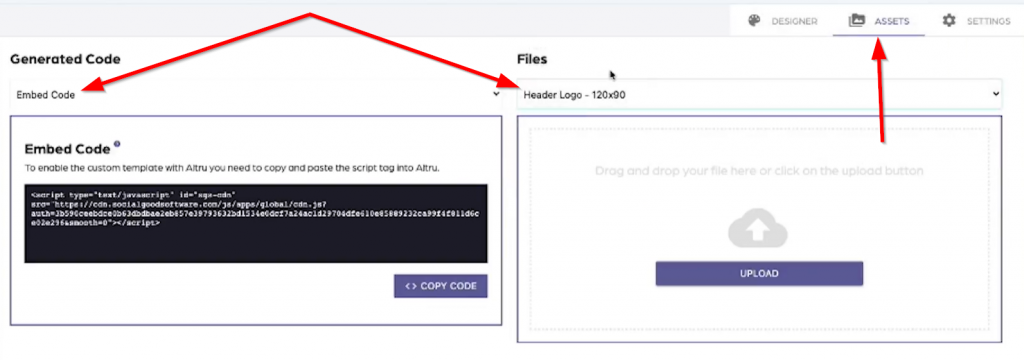
Assets
You can upload your favicon, logo for your header and footer, background, and things like that. You also have the option to upload custom fonts and embed codes to generate CSS code, header code, and footer code.
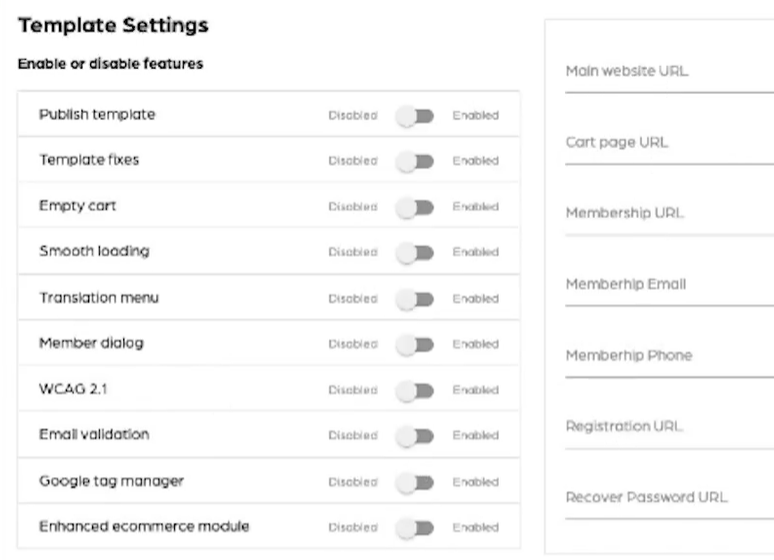
Settings
Below are the options that you can turn on if you want to include values but the SGS team is the one responsible for this, however, if you want to confirm email addresses, URLs, and things like that, you can go here to check it out.
Preview pages with the Online Template
Step 1: Copy the URL of the page that you want to preview from Blackbaud.
Step 2: Go back to the Online Template tool and click on Add URL.
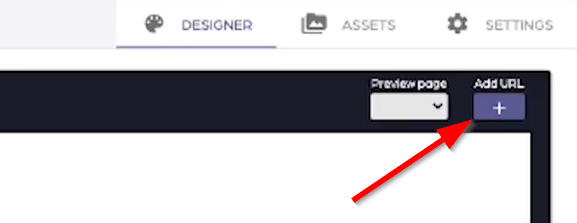
Step 3: A dialog box will pop out where you can type in the name of the page and paste the copied URL then click Add.
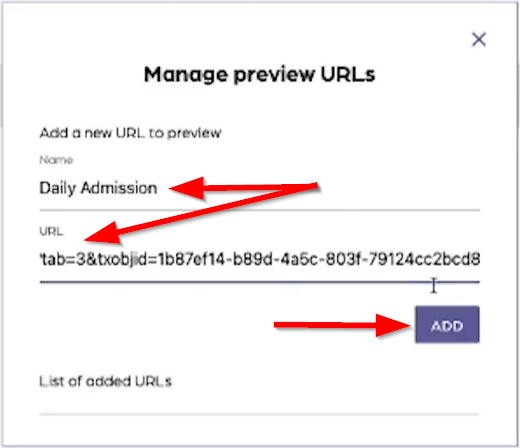
Step 4: On the Preview page there is now an item added. Wait until the designer loads the page for preview which will take a while. Essentially what we did is downloading the page from Blackbaud, apply all the stylistic changes then preview the page.
Step 5: You can click on the Save icon at the bottom and wait as the designer loads the page. In this case, there are no changes applied yet so the page loaded to the designer is totally identical to the Blackbaud. But if you click on the new tab icon, the URL is totally different from the Blackbaud so you can now actually share this link with your colleagues to preview.
Step 6: Let us try to apply some fixes to the webform and see what it looks like. On the Setting side, we will enable the following:
✅Template Fixes
✅Translation menu
✅Empty Cart
✅Member dialog
✅WCAG 2.1
✅Email Validation
Step 7: Go back to the designer and wait as it reloads the preview. Click on the new tab icon to better see the changes made and make adjustments accordingly.
You now have a better understanding of how Online Templates work. The purpose of this documentation is not to configure the template but to show you the process of adding different pages to preview and make necessary changes before your web forms go live.